Wallet Squirrel
  • Home
  • About Us
    • About Us
    • All Our Blog Posts
    • Media Kit and Pricing
    • Contact
  • Ways To Make Money
  • Income Reports
    • Income Reports
    • Our Total Savings
  • Search
  • Menu Menu
  • Pinterest
  • Facebook
  • Twitter

How Much Do Uber Drivers Make? Here’s What Drivers Say

April 26, 2018/5 Comments/in Earn Extra Money, Review /by Wallet Squirrel

If you're considering driving for Uber, it's one of the easiest ways to make money. We've considered it here on Wallet Squirrel, but first we wanted to ask around how much do Uber drivers make? As you'll see below, as an Uber driver you can work whenever you feel and make money per ride. However as an Uber driver, you are a freelancer in the eyes of the company and all costs of gas, insurance, accidents, wear & tear and taxes are your burden to pay. So in our examples, we note how much these Uber drivers make and include whether that's before or after expenses. #MakeExtraMoney #Uber #RideShare #Driving If you’re considering driving for Uber, it’s one of the easiest ways to make money. We’ve considered it here on Wallet Squirrel, but first we wanted to ask around how much do Uber drivers make?

As you’ll see below, as an Uber driver you can work whenever you feel and make money per ride. However, you are a freelancer in the eyes of the company and all costs of gas, insurance, accidents, wear & tear and taxes are your burden to pay. So in our examples, we note how much these Uber drivers make and include whether that’s before or after expenses.

Examples of How Much Do Uber Drivers Make

Mr. Money Mustache – $7 per Hour (after gas, insurance & waiting around)

Mr. Money Mustache did a great Uber driver experiment and shared his results after driving people around Boulder, Colorado for a while. He stressed the importance of driving costs and importantly your time. He was surprised with how much waiting around there was waiting for pick up requests, he noted how waiting around doing nothing affected his profit per hour. This profit per hour would be a lot lower if he didn’t receive tips, that is where most of this money came from, not the driving. You should consider this when trying Uber.

RideShareGuy – $15.68 per hour (before gas, expenses, etc.)

Harry who hosts the RideShareGuy, a blog centered around the ride-sharing economy, has been a big advocate of ride-sharing companies like Uber and Lyft hence the blog “RideShareGuy”. In 2017 he did a survey of 1,150 Uber/Lyft drivers on his website. He asked them a range of questions including how much do Uber drivers make and discovered on average, drivers made $15.68 per hour driving with Uber. If your curious, he found Lyft drivers made $17.50 per hour.

MIT Study – $3.37 per hour (after gas, insurance & waiting around)

MIT’s Center for Energy and Environmental Policy Research did a survey of more than 1,100 Uber and Lyft drivers on how much they were paid by the ride-sharing companies as well as their expenses such as insurance and repairs. This study was heavily criticized by Uber arguing the questions weren’t worded fairly causing MIT to take down the study, but here are the main points. Researchers found that a median driver generates $0.59 per mile of driving but it costs them $0.30 per mile to drive.

Stanford Study – $21.07 per hour (before gas, expenses, etc.)

A Stanford study focused on the gender earnings gap in the gig economy estimated an Uber driver’s gross hourly earnings at $21.07 before expenses. They even dug down into Uber’s payment formula and discovered Uber drivers are paid $1.70 as a base fare PLUS $0.20 per minute PLUS $0.95 per mile. While they estimated a driver’s expenses at $0.32 per mile.

For example a 2 mile &, 15 minutes trip could earn the driver $6.60 and cost the driver $0.64 in expenses. A real total of $5.95 for that ride.

SherpaShare Study – $11.33-$12.95 per hour (before gas, expenses, etc.)

SherpaShare did a 2015 study on Uber and Lyft drivers. They created an awesome graphic (below) and made a few assumptions from the data. In the larger cities where there is more frequent Surge time (fewer drivers & more requests = 30% price increase), drivers made significantly more. However, each city has different averages. Depending on where you live may determine if you should take advantage of being an Uber driver or not.

2015 SherpaShare Study on How much do Uber and Lyft Drivers Earn Per Trip

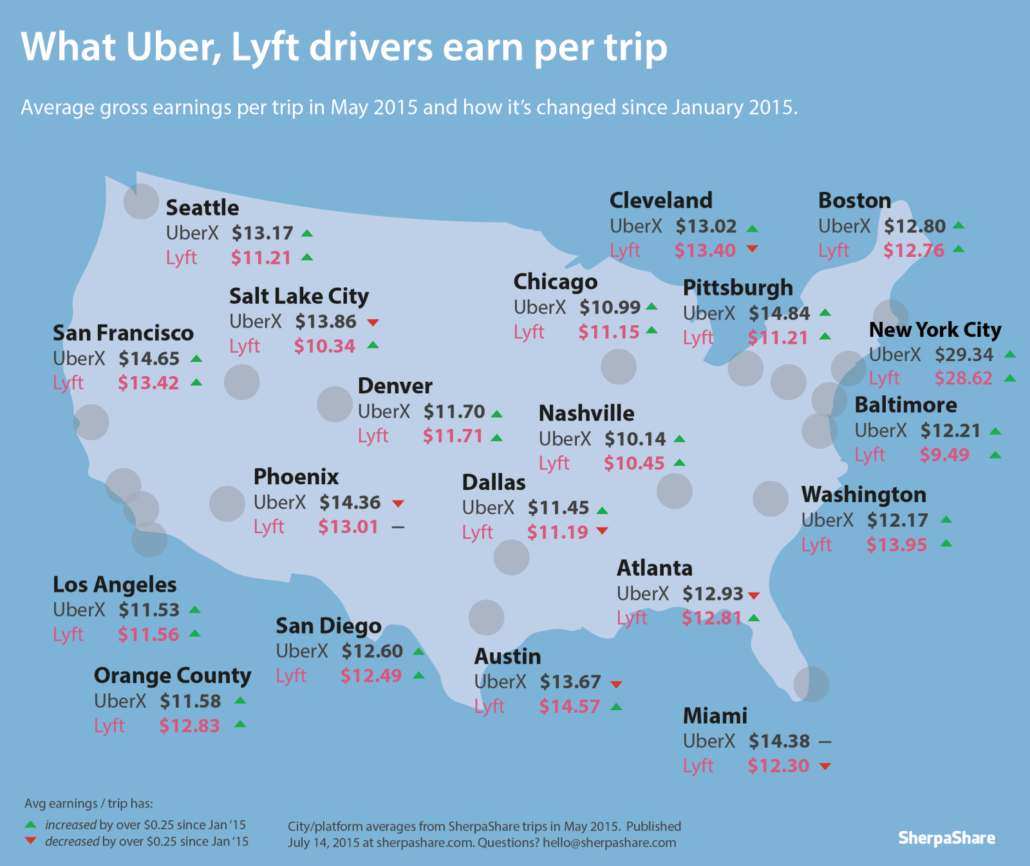
Source: http://www.sherpashareblog.com/2015/07/what-uber-lyft-drivers-earn-per-trip/

Cities with massive demand like New York had an insane $29.34 per hour for Uber drivers while smaller cities like Nashville had $10.14. If you live somewhere like Fargo, North Dakota, you may have a difficult time making any decent money.

Buzzfeed Study – $10.89 (after gas, insurance & waiting around)

Buzzfeed somehow gained a copy of internal Uber calculations to discover how much do Uber drivers make in three major US markets – Denver Detroit & Houston. It was important to them to include expenses into their calculations and found drivers in these markets earned less than an average $13.5 per hour after expenses.

For example, the average driver in Detroit earns $12.70 per hour or $8.77 per hour after expenses. Uber drivers in Houston earned on average $14.18 per hour or $10.75 per hour after expenses. Denver Uber drivers appeared to earn the most of the three major US markets, Denver Uber drivers earned $16.89 per hour or $13.17 per hour after expenses.

Buzzfeed - How Much Do Uber Drivers Make in Detroit

Source: https://www.buzzfeed.com/carolineodonovan/internal-uber-driver-pay-numbers?utm_term=.wcw78n4QN6#.mpxrRl8dkO

Formula for How Much Do Uber Drivers Make Per Ride

If you’re curious how much you could make, use this formula. The Stanford study above shared their formula for how much do Uber drivers make. Based on this formula, Uber really encourages long trips through heavy expected traffic for drivers to make the most money. The Uber Pay Formula is as follows:

Pay Formula for How Much Do Uber Drivers Make

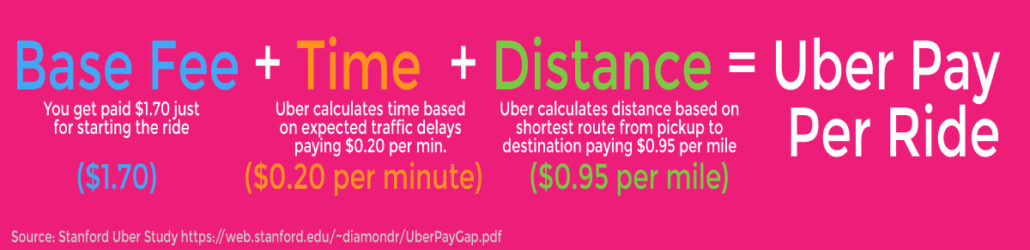
You may notice that this is considerably lower than any taxi fare you’ve ever received. There’s a reason for that, the Uber Pay formula is heavily advantaged for Uber Riders. Meaning Uber is highly cost competitive with taxi drivers so people choose Uber over traditional taxis, giving Uber drivers more driving opportunities at the cost of more money per ride.

Lastly, the biggest variable in the formula for how much do Uber drivers make is TIPS. Tips are not a constant factor in Uber rides so I didn’t include them in the Uber Pay Formula but they’re the single biggest reason some Uber drivers make more money. Next time you’re riding in an Uber, look around and notice the bottles of water and snacks offered by your Uber driver to entice a bigger tip.

If You’re Considering Uber, Make More Money by:

  • Driving isn’t that lucrative, you’ll honestly make more money using your Uber Referral Code and having your friends to sign up for Uber.
  • Receive tips for being nice and unique. Since your Uber fare won’t make you much money. You may receive tips from your passenger after a pleasant trip for having a bottle of water on hand or playing their favorite song.
  • Use an extremely fuel-efficient vehicle. Uber requests you use a car made in the last 10 years (they inspect it), so ideally a 2009 Toyota Prius was suggested by Mr. Money Mustache as the ideal car for lower insurance and high MPG range.
  • TRY to get longer trips in traffic to make the most money based on this formula ($1.70 base fee + $0.20 per minute +$0.95 per mile). Unfortunately Uber doesn’t tell you the destination until you pick up your passengers so you won’t know the distance or traffic.
  • Go out during “Surge” pricing. You’ll see a 30% increase in fees during these times and Uber will show you where Surge pricing is before you accept the ride.

Conclusion To How Much Do Uber Drivers Make

We’ve found Uber drivers make around average $10 per hour after all their expenses and, in most cases, Lyft will make you a bit more. If you put this in context, this is the same average wage for McDonald’s.

If you’re an Uber Driver please leave in the comments below how much you make per hour, we’d love to hear from you!

It may not be one of the most profitable ways to make money, but there’s a certain freedom and enjoyment knowing you’re the boss and working whenever you choose. Would you consider driving for Uber for this freedom?

Wallet Squirrel

Wallet Squirrel is a personal finance blog by best friends Andrew & Adam on how money works, building side-hustles, and the benefits of cleverly investing the profits. Featured on MSN Money, AOL Finance, and more!

www.walletsquirrel.com/

How I Replaced Lunches With Meal Replacement Shakes To Save Money

April 19, 2018/4 Comments/in Review, Save Money /by Wallet Squirrel
Looking to save some money on food? Andrew checked out the meal replacement shakes by Huel. Read his review to see what he thought. #savemoney #personalfinance #healthyeating

We’re all about trying new ways to save money (and time) on Wallet Squirrel. Here is one of my latest attempts to save both during my regular lunchtime meals. In short, this my story on how I replaced my lunches with a $2.36 Huel meal replacement shake for a week for a Huel Review.

First – What Is A Meal Replacement Shake?

These are shakes that contain all the nutrients you need in a meal. Everything we’re supposed to eat as humans to be healthy, but all contained in a shake. No more worrying if your meal is healthy or balanced, you have scientifically measured powder you mix with water and that is the meal of the future.

These really started to become more and more popular lately thanks to Gamers who didn’t want to waste time cooking. They wanted a fast and easy method to eat so they could get back to gaming with little effort. Plus if it was healthy, they would have more mental capacity and energy to continue gaming.

This movement resonated with a lot of people of today’s generation that also wanted an easy, ready-to-go meal replacement shake so they could continue their busy lives.

Are Meal Replacement Shakes Good?

Does it matter? If you’re drinking a nutritionally complete meal and for far cheaper ($2.36 per meal with Huel) than a regular meal. Does taste matter?

For most people, it’s still an issue. To these people, no it does not taste good! These meal replacement shakes are far from tasting good. At best you get bland and yes, that is best!

What Type Of Meal Replacement Shakes Are Available?

For this, I had to do some research. Normally I’m all about Hot Pockets, Pizza Rolls, and Ramen Noodles, so basically anything else on the planet is more nutritious for me than these. However, if I was going to go all in with a meal replacement shake, I wanted the best. During my research, I looked at 2 different meal replacement shakes that came highly recommended.

Huel & Soylent

Each of them had a loyal fan base and both fairly nutritional shakes, but I leaned towards Huel because it had a bit more protein per meal. Here is my one week Huel Review.

Huel Review: Here’s My Story Trying It For A Week

Pre-Huel Review – I spent about a week and a half researching Huel, reading reviews and listening to YouTube testimonials. I finally decided on Huel (located in the UK) and ordered off their website. I ordered 2 bags (28 meals) of their vanilla flavor. This is their recommended amount to buy your first time. Since it was my first time ordering, they gave me a free shaker and t-shirt. In total, it was $66.00.

I receive them in the mail about 2-3 days later, it was really fast delivery! I assume they have a distribution center in the US somewhere, otherwise, that was very quickly delivered from the UK.

I read on many of the reviews that people went to the extreme and replaced all of their meals with Huel for a week. That’s intense! In doing this, it took some time for their body to adjust to the alternate food source. They described some very embarassing gassy situations.

Sorry guys, I’m not doing that. I’m only replacing my lunches. I walk home for lunch every day with limited time to eat. I thought I’d substitute my lunches for this meal replacement shake to save both money and importantly time (also dishes).

Day 1 (it was rough) – It was the weekend so I tried I decided to try Huel early. I read the brochure that says 3 scoops is equal to 1 meal. So I throw 3 scoops into one of the shaker containers I already have and fill it with water. I didn’t think it mattered. The shakers I’m talking about have a metal wire ball that sits in the bottom and bounces around when shaken to additionally stir more of the protein mix in the water. I shake for about 2 minutes and take a drink.

AHHHHHHH, it was the weirdest taste of my life!

My face scrunched into a ball, shrinking as small as possible to hid from the strange taste of the Huel. I sat there motionless hoping it would all go away. In doing so, I tried to realize what was so off about it.

It didn’t have ANY flavor, it was the blandest thing I ever tasted! However it was the chunks of congealed powder that was the grossest thing ever. The powder clumped together in the water forming dry chunks of grit that caused my throat to revolt.

I just couldn’t deal with the chunks. It was the texture that got to me, texture wouldn’t wish it on my worst enemy. I was determined to finish it though, it was only Day 1. I kept taking drink after drink while working on something else to take my mind off it. In the end, it took me 4 hours to finish my first shake because my sub conscience wanted to delay the inevitable as long as possible. I seriously considered quitting this entire Huel review.

Day 2 – (it got better) – The next day was a Monday, so I came home from work and knew I had to try again. This time I had to do something about the chunks, I couldn’t take them anymore (YUCK)! So I threw the 3 scoops of powder, added water and dumped ice into a blender. I read ice helped in some other reviews. Then I let that concoction blend for a full minute. I’m sure 15 seconds would have been fine, but I wanted revenge at this point.

I poured the blended goo into the shaker they gave me. This shaker didn’t have a metal mixing ball like my others, but it did have a plastic mesh to help capture the large chunks of the powder from being drank. I appreciated this….

It actually wasn’t bad at this point. There wasn’t much favor but a complete lack of chunks really won me over. At this point, I realized maybe I could make it.

Day 3-7 (easy peezy) – The following days were easy and time-saving. I came home, set up the blender, added ice/water/powder, and poured it into my Huel shaker to drink. I began to finish the drink under 30 minutes (while doing something else). It wasn’t too bad and I eventually got used to the odd taste.

It’s not the worst thing in the world.

Moving Forward

I will probably continue to use Huel as my backup lunch option, like Peanut Butter and Jelly Sandwiches, when I have nothing else in my fridge after this Huel review, but it’s such a good option that’s quick and cheap. My only hang up is I regularly have to wash the blender and single Huel shaker after every use. My goal was to have zero dishes for the ultimate meal replacement.

Would you try this to save money?

Wallet Squirrel

Wallet Squirrel is a personal finance blog by best friends Andrew & Adam on how money works, building side-hustles, and the benefits of cleverly investing the profits. Featured on MSN Money, AOL Finance, and more!

www.walletsquirrel.com/

Robinhood Crypto Lets Anyone Buy Bitcoin and Other Cryptocurrencies

January 30, 2018/6 Comments/in Review, Robinhood App /by Wallet Squirrel

Robinhood Crypto Pinterest Vertical Header Image You may not know, but I’ve been a long time user of the Robinhood App. I did a review of the Robinhood App three years ago, and still, continue to use it. That’s why I am SO excited that they are now releasing Robinhood Crypto to buy and sell Bitcoin, Ethereum and monitor 14 other cryptocurrencies. At least starting off…

What is Robinhood Crypto?

Robinhood Crypto will let you buy and sell Bitcoin and Ethereum without any transaction fees. The free transaction feature has traditionally made the Robinhood App popular among millennials. While the Robinhood already allows anyone to buy and sell stocks, Robinhood Crypto will allow anyone to get in on cryptocurrency social phenomenon!

While the app will initially allow you only to trade Bitcoin and Ethereum, it will allow you to monitor 14 other cryptocurrencies. These are Bitcoin Cash, Litecoin, Ripple, Ethereum Classic, Zcash, Monero, Dash, Stellar, Qtum, Bitcoin Gold, OmiseGo, Neo, Lisk, and Dogecoin. Hopefully, eventually, you’ll be allowed to trade these in the future.

While the Robinhood App only lets you trade stocks during market hours. Robinhood Crypto will be available 24/7. You can tell this by their 80’s Tron graphic design styling on their Learn More Page.

Robinhood Crypto Will Be Available In February

Currently, all the company says about the release date is February 2018. They currently have a wait list for users and as of Monday night, January 2018, it has exceeded over 1 million users on the waitlist for Robinhood Crypto (join the waitlist here).

We expect Robinhood Crypto to be released in waves throughout February.

Only certain states will get it starting off, the new feature first be available in California, Massachusetts, Missouri, New Hampshire and Montana in the beginning. They haven’t released the following states.

What Does This Mean For Cryptocurrencies?

Robinhood is one of the first stock trading platforms to break into cryptocurrency trading scene. This gives some legitimacy to cryptocurrencies as they have often been seen as a joke. The Robinhood App will be a multipurpose marketplace for people to buy both stocks and cryptocurrencies. This isn’t something any other traditional stock brokers are is doing right now.

Currently, the biggest marketplace where you can buy and sell cryptocurrency is Coinbase. Coinbase only deals with cryptocurrency (no stocks like Robinhood) and charges a 1.5% – 4% transaction fee. This in addition to the negative media attention Coinbase has received for crashing during peak hours, lends itself as an easy target for Robinhood Crypto which has shown reliability, oh and it’s free.

It’s anticipated that the legitimacy the Robinhood App brings to cryptocurrency, free trading and it’s current millennial market. Robinhood Crypto will introduce many more people to an easy way to buy and sell bitcoin and other cryptocurrencies. The waitlist alone for Robinhood Crypto is over 1 million people or 1/3 of the current Robinhood App’s user base. That’s 1 million people jumping into cryptocurrencies.

Why Is The Robinhood App Doing This?

Well, Robinhood isn’t doing this for the money. Co-Founder of Robinhood, Baiju Bhatt expects “We are going to break-even on this” he followed “But it could dramatically increase our user growth”. Considering the Robinhood App has 3 million users, and the waitlist for Robinhood Crypto is already over 1 million. That’s pretty good user growth (plus lots of media attention as a legitimate place to buy Bitcoin). Here’s how Robinhood actually makes money since they don’t charge fees.

How To Buy And Sell Cryptocurrency?

Robinhood Crypto will function similarly to how you would buy stocks through their app.

You will search for the cryptocurrency symbols Bitcoin (BTC) or Ethereum (ETH) where you can see their price and follow the history over 1 day, 1 week, 1 month, 3 months, 1 year or over the entire history of the cryptocurrency.

Robinhood Crypto Screenshot

When you want to “buy”, Robinhood will give you an estimated price. Since cryptocurrencies are known to have dramatic price swings in a day, Robinhood Crypto will put a “collar” around your buy price. So if the sale can’t execute at the price you agreed to, it waits for the price to return to what you wanted or notifies you of the price change.

In times of rocket price rises or drops, you can always set limits on your orders to automatically buy/sell where you want. This will help on those crazy price swing days we hear about in the news.

Will You Try Robinhood Crypto? I am

I’m currently on the list, just behind 97,296 people. Here is the signup to join the Robinhood Crypto Waiting List.

I’m not a major advocate of cryptocurrencies, in fact, I don’t think they’re a big deal or will ever replace actual currency. I’ll only invest around $100 to say I’ve tried it and get my feet wet in the cultural phenomenon of cryptocurrencies. I’ll ride some of the hype and then exit without any qualms. It’s just nice that a stockbroker I trust and currently use is now making cryptocurrencies even easier to buy and sell, I have to try it.

Wallet Squirrel

Wallet Squirrel is a personal finance blog by best friends Andrew & Adam on how money works, building side-hustles, and the benefits of cleverly investing the profits. Featured on MSN Money, AOL Finance, and more!

www.walletsquirrel.com/

DIY Backyard Games – Know How You Can Save Money on Fun!

August 28, 2017/3 Comments/in Review, Save Money /by Adam

DIY Backyard Games – Know How You Can Save Money on Fun!

Recently, I had the experience to try to purchase some backyard games for an upcoming party in celebration of our new backyard.

You are probably asking yourself, “Why a party for your backyard?”

Well, a few months ago my wife and I (with the help of friends) redid our back yard. The remodel consisted of us completely clearing out the backyard to a blank slate then putting in a sprinkler system, garden, planter beds, and seeding. Yay!

Read about our home remodel savings here.

Now that the seed has sprouted to create a fairly lush lawn, we wanted to host a party in celebration. Kinda, like a house warming party. I know, I am weird.

Anyways, we decided that we needed some backyard games for the party. My wife wanted bags (or cornhole, I hate that name). I wanted Spikeball.

Why is everything so expensive!?!?

When looking to purchase, I couldn’t believe how expensive these game sets are. For bags, the finished product was $200 or more! Spikeball was $60 itself.

I even looked at other backyard games to see if something was cheaper. Nope. All were super expensive!

I thought to myself, there has to be a better way!

Buying off Brand

So, my journey started off by looking for a cheaper version of Spikeball. I knew I could not make this game on more own based on the custom net and the balls that you needed to play the game.

My thought was to maybe look for a knockoff brand. Usually, I am very skeptical and picky buying an off brand because I have been burned way too many times. Most of the time you save $10 bucks but the item only lasts a fraction of the time.

I decided to see what I could find. As always, I started off on Amazon. I like to start there because most items have so many helpful reviews. You can easily check if the item is going to last or not by the user reviews.


Luckily for me, it did not take long to find Slammo.

Its reviews were awesome. But just to be sure. I went to Google and looked up Slammo reviews. Sure enough, all came back with positive ratings! So I ordered Slammo instead.

What was the damage? Well, remember that Spikeball was $60 for the net, frame, 3 balls, and carrying case. Slammo is $40 for the net, frame, carrying case, 2 regulation balls, and a training ball. Plus, I saved an extra $3 using the Honey app on Amazon.

So far we have been very happy with the purchase. It just shows you that a little research and trust in a different brand can really save you some money.

DIY – Making your own

The next item to tackle was finding a bags set on the cheap. Like before, I checked out Amazon first. I was able to find cheaper sets but they looked like they were made for Oompa Loompas. The materials and the sizing were all off!

So, I thought to myself that I could make my own DIY backyard game bags set. I started by looking at the ACA website (yes, there is a professional cornhole association) for the regulation specs on how the boards should be made. From here, I put together a shopping list which was actually fairly short.

  1. 4 – 8 foot long 2×4’s
  2. 2 – pre-cut 2′ x 4′ plywood or any other piece of sheet wood (I used birch)
  3. 4 – 3 1/2 inch carriage bolts
  4. 4 – carriage bolt wing nuts
  5. Wood Screws
  6. Other items include paint or vinyl stickers

Next, I went to the nearest hardware store to buy all of the supplies for our new backyard game. Once home, I started measuring, sawing, cutting, and putting together the two boards (for the full instructions check here).

Oh! I forgot to mention that I did not make the bean bags myself. That would be a horrible idea! Instead, I went on Etsy and found these amazingly made Broncos bags for $30.

When everything was complete we took them out into the backyard and started playing. It was actually really easy to make the boards, only taking two hours.

All that is left to-do is to paint the set. My wife and I are trying to decide what general design we are going to use. We do know it will be Broncos colors with a vinyl logo.

Check out this Pinterest Board. Let me know what you think is your favorite is in the comments below!

Other DIY backyard games you could build

There are so many different DIY backyard games you could build for yourself. Below you will find a list of what comes to my mind.

  • Ladders
  • Giant Jenga
  • Washers
  • Horse Shoes
  • This really creative Ker-Plunk setup
  • Pipe Ball
  • For the really ambitious – a miniature golf course
  • Giant connect four
  • Tetherball

Do you have any other backyard game ideas?

Conclusion

All in all, I feel very proud of the money we saved. It is also scary though. Why? Well, because I want to keep building more games! I think next on the to-build list will either be ladders or giant Jenga.

Between buying an off-brand and building my own DIY backyard game, I will save about $120 after I get the bag boards painted. I still cannot believe how expensive they are to purchase.

What would you build first?

Cheers!
-Adam

1 Easy Way to Monetize A Blog Instantly with Affiliate Marketing

August 24, 2017/13 Comments/in Earn Extra Money, Review /by Wallet Squirrel

Having troubles monetizing your blog? We have the solution! Here is the simplest way to monetize your blog. #blog #bloggingtips #affiliatemarketing

I get it, you have a website or starting a new website and you’re asking yourself How to Monetize a Blog? I did the same thing 5 years ago when I started my first affiliate website. Since then I’ve come a long way monetizing websites with affiliate marketing. While the designs and websites have changed, I’ve always monetized my blogs the same way.

*If you’re not familiar with Affiliate Marketing keep reading, if you know all about it, skip to “1 Easy Way to Monetize Your Blog”.

Most Bloggers Monetize A Blog With Affiliate Marketing

Affiliate Marketing is the idea that when a visitor is on your website and clicks an outbound link to Amazon or Toys R’ Us from your website and buys something, you receive a commission of that sale.

Most bloggers do this because they are then earning a commission on products they already have or heavily recommend. Amazon encourages this because they are receiving customers they wouldn’t have gotten without your website. Everyone wins.

What does an Affiliate Marketing Link look like?

It’s super simple, Affiliate Marketing links just look like regular hyperlinks. Here are some examples:

  1. If you’re writing about gym equipment, how about a Pull Up Bar?
  2. Maybe you really love writing about Harry Potter decorations?
  3. Or you write about upcoming events like Mother’s Day and mention flowers?

All of these are affiliate marketing links. If you clicked on them and bought any of those items. I would make a commission and it’s simple to set up. Here’s how to do it for your site.

How To Start A $5K Blog
Free Email Course

A free step by step course with Andrew Kraemer looking at examples of blogs making over $5k, how to set up your own blog and what you need to do to get more traffic. 

Join us to get wonderful blogging tips and access to this amazing course! 

I will guard your email with my life. Check your inbox. =)

1 Easy Way to Monetize Your Blog

It’s super easy to start monetizing your blog and it can be set up in minutes! The easiest way to start affiliate marketing is to partner with an affiliate marketing company.

Secret: 1 Easy Way to Monetize your blog is to sign up with an Affiliate Marketing company that turns every outbound link on your website into an affiliate marketing link automatically that you can earn a commission on.

There a lot of different affiliate marketing companies out there, but I’m sharing my personal experience with Viglink which has made monetizing my blogs insanely easy. I’ve used them the last 5 years. They have a great WordPress plugin that turns every outbound link into an affiliate link. Plus they partner with over 2,000 merchants, so nearly every online store (Amazon, Target, Etsy, Finish Line, etc.) will pay you a commission through the Viglink network.

Here’s How To Start

I use Viglink for Affiliate Marketing, here’s how.

Step 1 – Sign up with Viglink
Go to Viglink and fill out their forms.

Step 2 – Install the Viglink Plugin on your WordPress Blog
Do a search for the “Viglink Plugin”, activate the plugin and insert your account code from your Viglink account.

Step 3 – Add links to your website and get paid
Now any regular link going to any of Viglink’s partner merchants (2,000+ of them) on your website are an affiliate link automatically. Just check your Viglink Account to see how many times people click on your links and if those clicks turned into sales, paying you a commission.

It’s that easy, you can monetize any blog in 5 minutes.

How much can you make affiliate marketing?

Most companies will pay you a percentage of the sale made. Each company within an affiliate marketing company is different. For example within Viglink, Amazon will pay 1% – 4.5% commission depending on the product category. Yet also in Viglink, 1-800 Flowers will pay an 8% commission. Usually the larger the company, the smaller the commission.

You’ll make more money the higher priced items you have on your site. For example, a 4% commission on an $11,312 Outdoor Inflatable Movie Screen is a lot different from a $30 Stainless Steel Kitchen Set. FYI 4% of that inflatable movie screen would be a $452.28 commission for you.

It’s a balancing act of having high priced items that could give you a higher commission vs lower priced items which the average person is more likely to buy.

Using an Affiliate Marketing Company vs the Vendor directly?

I think if you worked with Amazon directly through their Amazon Associates program, you may make a slightly better commission on each sale. However, you would be limited to only making money with Amazon.

Working with an affiliate marketing company like Viglink, you can sell Amazon products and products from 2,000+ other companies (here are the companies). You may lose a bit of the commission for the ease of dealing with only one platform. In my experience where I link to products all over the web, it’s worth it.

There are other Affiliate Marketing Companies too

I talk about Viglink just because I use them and like them. There are other companies that offer affiliate marketing like Clickbank, Skimlinks, LinkBridge and more. I’m just going off personal experience.

Affiliate Marketing is preferred over Website Ads

I always prefer Affiliate Marketing over Website Ads because ads are hugely distracting. Website Ads blink, flash and sometimes don’t even relate to the content your reading.

Affiliate Marketing simply creates a hyperlink in the content you’ve already written. It’s not any more obtrusive than any other link you create on your blog versus ads like on the right sidebar, over on the right there. =)

Personally: I use Google AdSense for Ads in addition to Affiliate Marketing, but if I had to choose one, I’d stick with Affiliate Marketing. Most of my Google Adsense revenue is in cents from views of the ads, I rarely see people click on the ads. However, I see a lot more people click on my Affiliate Links and those lead to sales which pay a lot more.

Start Monetizing Your Blog Today

You don’t have to use Viglink, but you should at least be signed up with some affiliate marketing company from Day 1 of your blog to start monetizing it. It’s a non-obtrusive way to monetize your blog, earning extra money on products you’re already recommending.

Let me know if you have any questions about monetizing your blog this way!

Wallet Squirrel

Wallet Squirrel is a personal finance blog by best friends Andrew & Adam on how money works, building side-hustles, and the benefits of cleverly investing the profits. Featured on MSN Money, AOL Finance, and more!

www.walletsquirrel.com/

CoSchedule Review: The Social Media Calendar I chose over Buffer & MeetEdgar

July 13, 2017/0 Comments/in Business, Review /by Wallet Squirrel

If you recall from my June Income Report, my July goal is to build a social media calendar to help grow our Social Media audiences. Currently, Social Media produces only 17% of our traffic, so I wanted to tap into that potential. A social media calendar would regularly/consistently stay in contact with those audiences. So I compared 3 different social media tools for this CoSchedule Review to do just that, manage Wallet Squirrel’s social media.

Obviously, from the title, I choose CoSchedule for Wallet Squirrel, but anyone wanting to dramatically improve their Social Media game should look this over.

CoSchedule Review Header Image

The Three Different Social Media Tools I Tested:

MeetEdgar – This tool allows you to automate your social media messages. You can write a Tweet/Facebook Post/LinkedIn Message and have it automatically repost every month, 3 months or year so that you’re never running out of content. While this is a great tool, the interface was a bit clunky for me in the 14-day trial and for the price of $45 per month, I wanted a bit more than just a backlog of messages automatically posting.

Buffer – This allows you to set up a queue of social media messages on Twitter/Facebook/LinkedIn where you can write messages beforehand, and Buffer will publish them based on timeslots you decide. Think of writing one message then selecting all the different social media platforms you want to send it out to. This eliminates going into each social media account and copy/ pasting your message each time. You can also schedule retweets so you don’t have a bunch of messages going out at once.

I actually use Buffer at work and love it. The biggest downfall is that once you send a message, you can’t automatically reschedule it to be sent again. Since Tweeting only hits 10% of your audience at a time. You’d manually have to add the same tweet over and over and over. It’s just a giant waste of time.

CoSchedule – This is really a combination of the two. CoSchedule allows you to see a full calendar of messages going out and automatically ReQueue them to go out again if they’re popular. I’ve done the 14-day trial and now I’m a paid subscriber. I’m a bit of a fan. Let me dive a bit more into CoSchedule.

I chose CoSchedule, but what is it?

Because CoSchedule loves demonstration videos, here is a brief CoSchedule Review Video of their software.

To me, CoSchedule is a visual calendar that you can see when your different social media posts are going out. You can schedule a post in advance and automatically repost (they call it ReQueuing) popular content so your audience doesn’t miss great content. Here is a screenshot of what Wallet Squirrel’s calendar looks like after using it for two weeks during the CoSchedule Review.

CoSchedule Review Social Media Calendar

How I use CoSchedule for my Social Media Calendar

Not going to lie, it’s a bit intimidating at first, as is any software. It integrates into a number of social media platforms and WordPress, it took a bit to get my head around it. However starting off, I primary use it for my social media accounts.

  • Facebook
  • Twitter
  • Pinterest
  • (they also do LinkedIn, Google+, Instagram and Tumbler, but I don’t use those yet)

How I Setup Social Media Campaigns

This is a term I’ve heard as a buzz word, but I never really knew what it meant until this CoSchedule Review. I’ve come to learn that a social media campaign is a series of social media messages posted at different times, with all the same purpose. Like the 1,000 tweets you read when Lady Gaga launches a new album. Those set of tweets, collectively are a social media campaign.

For me personally, I use their social media campaign to promote new blog content. I click their campaign button and I set up a template for my new Income Reports. To describe the screenshot below, I add the URL of the post I want to promote and it automatically inserts that hyperlink into a series of messages scheduled to go out that day, the next day, a week later and a month later. All the times are completely customizable. Each message has a default basic message like “check this out”, but I tweak these each time. This is one of my favorite features because it provides a carpet bombing of social media messages for new content over an entire month, created in seconds.

CoSchedule Review Social Media Campaign

How I Automatically Repost Popular Content

CoSchedule has a popular feature called “ReQueue” which creates a cache of messages that will automatically be published if you have a gap in your social media calendar. Let’s say I want to post 3 tweets each day. If I don’t have a social media posts going out on Friday. CoSchedule can pull an old social media post from my library of social media messages to fill that gap.

Oh my goodness it’s so nice to automatically repost evergreen content

For example last Sunday while writing this CoSchedule Review, I filled my ReQueue library with fun social media messages promoting old content. That way, I will always have at least 3 tweets going out a day. You can even set categories for your ReQueue library such as “Evergreen Content”, “Promotional Content” like a referral link to Bluehost website services or any categories you can think of. Here are the categories I’ve created so far.

CoSchedule Review ReQueue Categories Screenshot

Quick CoSchedule Review Pros/Cons

Pros

  • The software allows you to create an entire social media campaign, aka numerous social media messages on different platforms, in seconds
  • CoSchedule allows you to automatically “ReQueue” popular content so that it never disappears in the social media abyss. It automatically posts old content whenever you have gaps in your social media calendar.
  • It has the pros of both Buffer and MeetEdgar.
  • The really clean design makes looking over your calendar very easy.

Cons

  • It’s pretty pricey, it says $39 per month for their solo blogger plan, but it doesn’t include the ReQueue feature which everyone wants. I especially wanted. If you want ReQueue, you need to pay another $30. So in reality, it cost $79 per month. WTF! This is one of the most expenseive social media calendars I’ve found.
  • The Social Media Analytics isn’t included in the base $79 per month I’m currently paying. If you want analytics, you need to pay more. Yuk, at least Buffer had at least basic analytics in their $10 per month plan.

Why I chose CoSchedule over Buffer and MeetEdgar

As a current user of Buffer, it is great but there are days that I don’t have time to post a new message to social media and my Buffer queue ran out. I needed something with Buffer’s queue feature, but also automatically posted content like MeetEdgar. I considered getting both of these since combined they’re cheaper than CoSchedule, but I prefer to use one piece software that incorporates the best of both.

Plus there are other benefits of CoSchedule that I haven’t touched on during this CoSchedule Review. Mainly because these features are singularly what I wanted the software for. It’s currently a must if I want to grow our Wallet Squirrel social media presence. Not just rapid firing social media messages, but creating conversations and dialogue while reminding our audience of older content. Those combined features won me over.

Conclusion

I’m willing to try CoSchedule out for a couple months to see how this goes, use my referral code for 14 DAYS FREE if you’re interested in trying it too. So far I’ve been impressed with the power this software provides during my CoSchedule Review. Plus their blog has so many great tips on social media you don’t need to pay for. In 6 months I’ll do an ROI “Return on Investment” Analysis to follow up on my progress.

So far, I’d honestly recommend it to any blogger who can afford to spend a ridiculous $79 per month (save 50% if you write a review). It’s a great tool to visualize a social media calendar that’s smart enough to fill in the gaps. Like a Social Media Manager would. Follow us on Wallet Squirrel’s Facebook and Twitter page to see it in action.

Are there any other tools you use I didn’t mention?

*Disclaimer I wasn’t paid for this review, but CoSchedule does offer a 50% discount if you write a review. Since I love saving money, we did this review but maintained our honest opinion and user experience.

Wallet Squirrel

Wallet Squirrel is a personal finance blog by best friends Andrew & Adam on how money works, building side-hustles, and the benefits of cleverly investing the profits. Featured on MSN Money, AOL Finance, and more!

www.walletsquirrel.com/

AppMatch Review: A Test to Find the Perfect App for You

June 29, 2017/0 Comments/in Review /by Wallet Squirrel

The team at AppMatch recently reached out to Wallet Squirrel to ask if we could do an AppMatch Review for the latest version of their app. At first, I laughed because I thought it was an app to tell you about other apps and it absolutely was. However, it was more like a StubleUpon for Apps, curating tons of apps to find those that fit your interests.

What is AppMatch

AppMatch is a site (only accessible on your smartphone’s web browser) that provides a 5-minute questionnaire, using your answers to filter apps, finding the absolute best apps for you. Think of a BuzzFeed Quiz, but for apps.

AppMatch hopes to solve the difficulty of navigating millions of apps on the app stores by getting to know you and recommending apps based on your responses to their curated questionnaire.

What Happened When I Tried AppMatch

I started my AppMatch Review by going to their website from my computer. It’s a simple website that has a large button “Click to Start”.

AppMatch Review - Desktop Homepage

After instinctively clicking “Click to Start”. I was quick to find a pop-up that asked me to visit their website through my mobile browser rather than my desktop. They don’t have an app, so you can only access the service through the mobile browser on your phone and don’t try to search the app store for one because you’ll only find dating apps like “Match”.

They don’t have an app, you can only access the service through the mobile browser on your phone.

Not for lack of trying. I later discovered this was because the App Store doesn’t allow apps that recommend other apps in the App Store, perhaps Apple doesn’t like the competition. AppMatch did submit an app, but it was rejected, like all discovery apps. That’s why there are no other apps like this out there right now. Luckily web browsers on phones nowadays are just as powerful as apps.

So I opened AppMatch.com on my phone.

AppMatch Review - Mobile Homepage

I Took Their App Personality Test

I couldn’t resist the large “Click to Start” button and was immediately thrown into their personality test. I have to admit it was super nice to start without having to sign up or give my email address. You just start.

You have to answer some “Introductions” questions first, there are maybe 7 Introduction Questions.

AppMatch Review - Introduction Questions

Once you answer their Introduction questions, you’re pulled into their “Quizzes” section where you select different quizzes based on your preferences. I assume this is like categories in the app store. From the screenshot below, you can guess “Lifestyle”, “Finances”, “Productivity” and I’m not sure about Paranoid Android. Maybe security?

AppMatch Review - Quizzes Menu

I selected “Finances can be fun….Sometimes” and took a couple of their other personality test to see what would happen and what apps it’d match me with. I don’t know maybe it’d match me with the Fluid App or a cashback app like Ebates.

Some questions made sense: The questions asked if I’m secure with my phone, my profession, and a happy person. I’m assuming this is trying to figure out if I like phone security and light-hearted apps that centered around my profession (Marketing). OK I get that

Some questions made no sense: “How is your relationship with your mother” & “Do you have deep rooted emotional issues”? I have absolutely no idea how this will affect what apps I prefer, but I continued. Maybe they threw in some questions to make sure you were paying attention?

I’ll admit the questions during the AppMatch Review were creative and they’re not afraid to cuss. I feel like these questions were curated by someone’s sassy best friend after a few glasses of wine. Check out the fourth response down.

I Finished The Test

In the end, it recommended to me some app called “Slice”. I instinctively thought, I’ve never heard of this, this is stupid. However, upon further review, I looked up Slice and it looks really cool. Especially since I just had an Amazon package lost in the mail (FYI – Slice tracks things you buy online). I could totally see myself using this.

What was on the AppMatch Review Pro List?

  • It’s a cool idea. They are solving the problem of millions of apps on the app stores by sorting them on your personality.
  • It’s really fun to take a few funky questions and see what apps pop up specifically recommended to you. It has the fun of a BuzzFeed quiz, but without all the ads in your face.

What was on the AppMatch Review Con List?

  • On my first attempt, the website did crash on me. They explicitly state that it’s in Beta. So I can understand a few hiccups. It’s a work in progress.
  • You can ONLY take their test on your phone, so when it recommends an app after the test, you can download it from your mobile device. I’d like to see a similar feature from their desktop website since it’ my primary web surfing device.
  • There are over 2 million apps on the app store, but not all of them are cataloged on AppMatch yet. AppMatch says they are regularly sifting through the App Store and tagging apps to be filtered by their personality test, but we have no idea how many apps they currently have cataloged. So we don’t know the diversity of their recommendations.
  • I retook the test and it told me it found ZERO matches. Does that mean I have no personality? How out of all the apps out there, there are ZERO that fit me? I think this is another of the hiccups of their BETA.

AppMatch Review - Zero Matches

How AppMatch Makes Money

To understand how a business is run you need to understand how they make money. From their website, it looks like AppMatch makes money from App Developers paying them to review their app for placement in the AppMatch ecosystem.

AppMatch has the audience of people taking their tests and App Developers will pay to be one of those apps recommended to us. Being in the AppMatch ecosystem doesn’t guarantee that the App Developer’s app will be suggested, only that it will be reviewed before the 2 million plus other apps in the App Store.

AppMatch Review Conclusion

I’ll admit it was a lot of fun (minus the small crash) testing this for the AppMatch Review. I love finding new productivity apps out there to help me do/be better. This was just another way to find those apps without scrolling through the app store, looking at description after description. I’ll admit, I was hoping for some more cool finance apps like Mint and Robinhood, but I’ll continue looking.

They still obviously have much work to be done, but I can see it as a fun solution of an overcrowded app store.

*Disclosure – I was paid for this review, even after telling them I would only give my honest opinion. 

Wallet Squirrel

Wallet Squirrel is a personal finance blog by best friends Andrew & Adam on how money works, building side-hustles, and the benefits of cleverly investing the profits. Featured on MSN Money, AOL Finance, and more!

www.walletsquirrel.com/

How I published my first article on Seeking Alpha and got paid

June 22, 2017/10 Comments/in Earn Extra Money, Review /by Wallet Squirrel

Over the last 2 years, I’ve done SO much writing for this blog. I wanted to branch out, stretch my creative muscle and financial know-how writing for a larger publication that pays per article (here’s a list I made of 20+ websites that pay you for writing). I started out on the financial website Seeking Alpha since it’s commonplace now for me to write/talk about finance. Here are the blueprints to How I published my first article on Seeking Alpha and got paid.

First, What’s Seeking Alpha?

Seeking Alpha is an online financial journal for investment research covering stocks, bonds, assets classes, ETFs, and investment strategies. It looks a bit like this.

Why Write for Seeking Alpha?

Anyone who is first starting out as a freelance writer should start with a small publication, getting their feet wet and then lead into larger publications. You shouldn’t expect to be published in the New York Times with your first article.

I heard other bloggers talk about writing for Seeking Alpha so I looked into it. I even heard it was easy to get published on Seeking Alpha. So I decided to start small (FYI, it’s not that small).

Seeking Alpha has TWO different publishing platforms. One is like a blog where you sign up and they’ll publish any article you write to your own “mini-blog” and the other is for exclusive articles that Seeking Alpha will pay you for. I discovered that was MUCH harder to get published on.

What does Seeking Alpha Pay-Per-Article?

Every article exclusively published on Seeking Alpha receives a base payout of $35 PLUS $0.01 for every page view. So no matter what you get published, you will receive $35 and if it’s widely viewed you’ll receive $10 per every 1,000 page views.

The higher the page views, the more money you make. Plus there is no timetable for payments, so you’ll continue to receive paychecks from high visited articles for months.

The average article on Seeking Alpha makes $68.79, meaning the average article receives 3,379 page views. It’s way more then what Ebates pays.

Here’s How Writing for Seeking Alpha Went Down

Don’t expect it to be easy

I went into this thinking it was easy (like the other bloggers said) so I spent a little time on my first every article. After recently selling off a majority of my portfolio to pay off my car, I sold my position in Coca-Cola first. So I figured I’d write about that.

My first article was titled “3 Reasons Why Coke is Basically Just Backwash Now”. I spewed out some opinions, ran up about 600 words and hit submit. I submitted it to the “mini-blog” AND their exclusive article submission platform that actually paid per article.

Well, it was published to the mini-blog no problem, that was easy! However, I discovered it’s MUCH harder to get published in their exclusive journal where they pay-per-article. Here was my first Rejection.

HOLY CRAP, that is not easy, they flat out rejected the article. I honestly wasn’t expecting a rejection and it kind of hurt. I REALLY wanted to give up. I only tried again I made it a goal to get paid for an article in my May Income Report. Stupid goals.

I only tried again because I made it a goal to get paid for an article in Income Reports. Stupid goals.

They gave me some great feedback though, so I revised my article and tried again.

I revised my article and re-submitted

I have to admit, they at least read the article close enough to give me valuable feedback. I’m pretty sure if I ever went back to school to get my MBA, I’d submit all my articles to Seeking Alpha before my professor.

So I narrowed my focus more and concentrated on one of the reasons why I wanted to abandon Coca-Cola. I narrowed down my focus to the health movement and how the Soda Tax is affecting the soda industry. I sourced every thought with hyperlinks and fleshed out opinions replacing them with facts. I was quite proud of my article.

It still wasn’t enough, Rejected.

SERIOUSLY! Was this the editor for Berkshire Hathaway? I had over ten sources and a well-written piece covering an interesting topic. However, they wanted more on how it specifically affects Coca-Cola. My article should cover how exactly is A is affecting B and how it relates to C. So they wanted to get in the weeds with how exactly is the Soda Tax directly affecting Coca-Cola and how is the company responding to the growing health concerns.

All illusions that publishing to Seeking Alpha was easy, were now shattered. I started going finance ninja and pulling stats.

I revised my article once more and was accepted!

I spent more time looking through Coca-Cola’s financial reports, understanding how the current 8 cities who passed a “soda tax” have affected both their tax growth, the decline in soda sales and future growth of the tax. As well as read Coca-Cola’s Letter to Share Holders about the future of the company and their responses to the current cities enacting the tax.

I now had a pretty good idea now how the Soda Tax is affecting Coca-Cola and Seeking Alpha loved it.

YES! The final article is now published on Seeking Alpha, Coca-Cola And The ‘Soda Tax’. In the first 2 days, it’s received 1,340 views which equals $48.40 ($35 base pay + $13.40 for page views).

As well as receiving over 38 comments, primarily from people who REALLY hate taxes.

Conclusion

It’s exciting to think of oneself as a finance writer, once you’ve been officially paid for an article to be published. There is so much that goes into an article that gives it substance and obviously a bit more difficult than I originally imagined. However, the process I feel is similar to other freelance writing jobs if you want to earn extra money.

I will absolutely do a couple more Seeking Alpha articles in the future. Maybe once a month, it’s a great learning opportunity, and I’m all about residual payments from page views as a new passive income stream. Although in the future, I’ll use a tool like SEMrush to find popular keywords that can get more page views and more passive income. =)

Wallet Squirrel

Wallet Squirrel is a personal finance blog by best friends Andrew & Adam on how money works, building side-hustles, and the benefits of cleverly investing the profits. Featured on MSN Money, AOL Finance, and more!

www.walletsquirrel.com/

Fluid App Review – Make Money Renting Your Stuff Out Instead of Selling It

May 18, 2017/3 Comments/in Earn Extra Money, Review /by Wallet Squirrel

I stumbled upon the Fluid App also known as Fluid Market a few months ago after a friend, Matt Holmes of Handshaking.com, told me about it. It’s an app that lets you rent out your stuff for money instead of selling it. Since then I’ve been using the app and testing it for this Fluid App Review.

What is the Fluid App?

Fluid Market is a Start Up making some big waves in Denver. They have essentially created an online marketplace (through the app only) that people can rent items from other people.

Think Craigslist, but instead of selling your items, you rent them out for money. Or you can rent items you only need once, like a carpet cleaner, instead of buying one. This is what it looks like.

Fluid App Review Infographic of Screenshots

The idea being, if you only need an item once like you want to rent a scooter for the day. You can find one on Fluid, see how much it is per hour/day and contact the owner to rent it. You pay everything through the app so you’re not actually exchanging money with other people. Take that Craigslist!

My Experience Using the Fluid App

If you’re like me, you’re thinking “This looks like an awesome way to earn more money, but I don’t want other people damaging my stuff”. I was nervous too, I’ll admit that. Their $1 Million insurance policy helped me feel a little bit better, but still, it’s my stuff and I don’t want to deal with insurance hassles, so I started small for the Fluid App Review.

I searched around my 583′ square foot studio apartment for stuff that was valuable enough people would want to rent, but I didn’t mind getting banged up a bit. Not that it would, but again, I was hesitant.

The ONE thing I found was my Clothing Iron. I figured someone in the area may need a clothing iron, so what the hell.

I Downloaded the Fluid App and Created an Account

To start my Fluid App Review, I downloaded the app from the android store (it’s also on the Apple Store). At first, it was a bit slow and clunky. However, it’s gotten SO much better from what it was a couple months ago. Someone in their tech support is doing something right. Plus it’s a StartUp up, so I’m sure they’re constantly updating and improving it.

After downloading the app, I get a screenshot like this

Fluid App Review - Log In / Sign In Screen

It gives you the option to use an email or Facebook, I selected email only. I’m sure there’s a social component to the app that’s nice, but I just wanted to try it out. I didn’t want to message all my friends on Facebook about it.

Then I got that clunky loading screen (again it’s gotten a lot better!).

Fluid App Review - Loading Screen

Once in the app, you have categories on top and a random assortment of items below. I haven’t figured out how it chooses what items are on the home page. These are all the items you can rent. From each quick view thumbnail, you can get an idea of what items they have. Including the name of the item, photo, the cost per hour/day/week, the item’s rating and how far you have to travel to pick it up.

Fluid App Review - Items for Rent

If you click on an item, like the scooter I want to rent ($15 for the day!). You’ll get a more detailed description of the item and lender, along with additional photos, which really helps! At that point, all you have to do is scroll to the bottom and click “Check Availability” to rent it.

Fluid App Review - Scooter for Rent

How I Rented Out My Stuff On The Fluid App

So I had my Clothing Iron and I was ready to start renting it out. I go to the top left icon to see all their options, and select “Add Item”

Fluid App Review - Menu

Then I start filling in the info on what kind of Clothing Iron, add photos (either from your gallery or take them on the spot) and set my price. Once you add the category, you’re pretty much done. Anyone can add an item and it’s incredibly easy through the app. It took less than 5 min.

The Fluid App will take 20% of every transaction, they say this is to help pay for the insurance and upkeep of the marketplace. Keep that in mind when pricing your item.

The last thing you do is add how people are supposed to contact you about renting it out through “Pick Up/Drop Off” instructions. I asked them to email me, but you can have them call you as well. Do this in a public location like I talk about in How To Sell You Stuff On Craigslist.

FYI – No one can see your number or email until AFTER they have paid. That part is SO nice.

Fluid App Review - Clothing Iron Upload

Then I waited. So far, I haven’t heard from anyone about renting my clothing iron. Lol I guess it’s as useless to me as it is for anyone else.

If I do make any extra money from this, I’ll add it to my monthly income reports.

So now I’m looking at other items to try and sell on the Fluid App.

How To Rent From Other People On The Fluid App

This process is equally as easy. You select the item you want, hit “check availability” (in case it’s rented out already) and you’ll get a list of times in hours that you can rent it out for. Select how many hours you want it and that’s how it’ll calculate payment.

Then you submit your request and pay via credit card. There isn’t a paypal option that I’ve noticed during the Fluid App Review. It’s credit card only.

Afterward you get in touch with your lender to coordinate the pickup. Basically, the app just provides the marketplace of items to rent and the payment option, the rest is up to the renter and lender to coordinate.

Pros/Cons After The Fluid App Review

Pros

  • It’s a great way make extra money renting out your old stuff. You can make regular revenue off your old stuff rather than selling it once.
  • It’s a great way to try items before you buy them or likely only use once like a steam cleaner.
  • They have a growing marketplace of items. Every time I open the app, they have new items I can rent out.
  • People can only contact you AFTER they paid, so unlike Craigslist where I got multiple inquiries a week over the same questions from people who may or may not actually buy something. The Fluid App only gives the renters your info after they paid for the item. That is SUPER nice.

Cons

  • All the photos are of people’s unique stuff and people SUCK at taking photos. It lacks that crisp look because they are working with crappy photos. It just hurts the overall look of the app.
  • They are leaning heavily toward renting out high price items like cars. So it’s becoming similar like Turo in some ways which I’m not sure they wanted to do. I hope they continue to rent out the low priced items like extra pots and pans I could use for a large family brunch.
  • The Fluid App handles the marketplace and money exchange, but I still have to spend my time meeting with people for pick up/drop off. I wish there was an easier way.
  • It’s still a small “Denver” community to rent from, however I can see these guys growing, like big.

Don’t get disparaged about my Cons, I’m being pretty critical of the new start up, but I really am impressed by this company. In fact, I was so impressed by these guys during the Fluid App Review, for the fun of it, I checked to see if they were hiring. Who knows, if they do things right, it could be the next SNAP. So I submitted a quick resume to their marketing team. What the hell.

My IPO dreams were rapidly cut short the following day when Fluid’s HR team contacted me to say they were looking for someone with a little more “Rental Experience”. I guess my couple years in college renting out outdoor gear to students wasn’t enough. LOL it’s ok, I’m still a fan of the app.

Conclusion

This is a pretty exciting app that I hope grows because now I’m constantly looking for new stuff to rent out. It’s a really neat idea to make extra money. PLUS a sustainable revenue source if you have an item people really want to rent (bouncy houses, VR equipment, and cars are high demand items). What do you think of my Fluid App Review? Would you rent out any of your stuff?

Here’s me contemplating what to start renting out next. FYI that’s an electric scooter, totally bad ass I know. =P

Wallet Squirrel

Wallet Squirrel is a personal finance blog by best friends Andrew & Adam on how money works, building side-hustles, and the benefits of cleverly investing the profits. Featured on MSN Money, AOL Finance, and more!

www.walletsquirrel.com/

Ebates Review – Why I Wish I Started This Two Years Ago

April 27, 2017/2 Comments/in Earn Extra Money, Review, Save Money /by Wallet Squirrel

Who does not love saving money? Ebates is the way to earn money back after your purchase. Learn from this Ebates review if the application is right for you!

Ebates Review – Why I Wish I Started This Two Years Ago

Three weeks ago, I received a message from my buddy Cameron over at SquirrelBox suggesting to do an Ebates Review. I initially scoffed because I DON’T NEED ANOTHER APP!

You, like me, have seen “Ebates” pop up on your social media and thought the same thing. So let me explain what Ebates is.

SPOILER: It’s awesome, and not just another app.

Ebates Review – What is it?

Ebates is an online company who partners with over 2,000+ stores (many popular stores you regularly shop at). Whenever you go to one of your favorite stores, like Amazon, from the Ebates platform and make a purchase. Amazon assumes you would have only visited their site because of Ebates and gives Ebates a 4% commission. Then Ebates passes on those savings to you, and gives you 3% cash back for your purchase.

Ebates is essentially an affiliate company that pays you to visit their site first before you start shopping.

My Experience Making Cashback with Ebates

I’m running the Bolder Boulder in 5 weeks and I need new shoes. I’ve used the same running shoes (type & size) the last 7 years, so I’m going to buy them online.

Here’s my process.

I go to Ebates.com and search for ASICS since I’m going to buy a new pair of ASICS from their online store. Sure enough, the ASICS store pops up and Ebates tells me right away that their partnership provides me 1.5% cash back on purchases. Cool!

Ebates Review - Asics Page


In addition, Ebates also has all of ASICS best deals right now. Also Cool!

Ebates Asics Page Deals


It doesn’t matter which deal you select, these are all just notifications. Any of them you select “Shop Now” will just send you over to the actual ASICS Homepage. You’ll see a loading screen like this.

Ebates Review - Sending Page

This entire process takes 30 seconds, now you’ll be on the ASICS page and anything you buy, you will make 1.5% cash back. Plus if you have the Ebates Chrome Extension like me, you’ll be reminded in the top right, how much you’ll save.

So as I look at my costly shoes, I’ll be reminded to of my 1.5% cash back on my $109 running shoe. So I’ll make $1.64 through Ebates on this purchase. I’ll make more since it’s my first purchase through Ebates and I used Cameron’s affiliate code (we’ll get to that in a second).

Asics Shoe Purchase


Remember, I use my 2% cash back credit card for everything, so I’ll gain an additional 2% off the purchase + plus the 1.5% from Ebates. Wahoo!

When does Ebates pay me?

Every time you make a purchase (like a new pair of ASICS), Ebates will hold onto your cashback rewards. The companies, like Amazon, ASICS, Walmart, pay Ebates and Ebates pays you, quarterly. So 4 times a year, you’ll receive a check from Ebates. This can also be PayPal or you can donate it to a charity or organization.

Here is their quarterly payout schedule:

Ebates Payout Schedule

If your account is less than $5.01, Ebates will roll that balance into next quarter’s payout. It just a lot of processing fees for them, so they do $5.01 minimum payouts. I can’t blame them for that.


If you’re thinking that my $1.64 is too small for a payout, I’m actually at $11.64 because I used a friend’s affiliate code and earned $10 extra dollars. Use my affiliate code for your $10 extra dollars.

PLUS any cashback you recieve from Ebates isn’t taxed because the IRS considers “cashback” as a “discount” to your purchase like coupons. That’s why when you sign up for Ebates, all you need is a email, password and address for them to send your “big fat check” (their phrasing), not tax forms for you to fill now.

How do YOU sign up for Ebates?

It’s easy, go to Ebates here and enter a quick email and password. No more info than that. It takes less than 30 seconds and you can start looking around their marketplace and checking out all their partnerships. You’ll only have to add your address once you’re ready to cash out.

Use my Affiliate Code!!!

If I’ve educated you enough about Ebates to at least check it out. PLEASE use my affiliate code. This way YOU will earn an extra $10 at payout and it gives us at Wallet Squirrel an extra $5 through their affiliate program, so we can pay for things like internet and electricity.

I would never recommend something unless I REALLY like it and I’m a fan of after this Ebates review. In fact, wish I started using it 2 years ago when I first started to really get into Online Shopping.

Sign Up Today For Your $10 Gift Card

I would have $68 if I started using Ebates 2 years ago.

I wish I did this Ebates Review 2 years ago when I first started Online Shopping. I know I’m a late bloomer. My parents told me that hackers would steal ALL my info and identity, so I was terrified. Since then I’ve learned how security works, feel more secure against Nigerian Princes and now LOVE online shopping!

In the last 2 years, on Amazon alone, I have spent $1,145.64 according to my purchasing history. So since Ebates has 3% cashback on Amazon.com. I could have made $34.36 from Ebates in the last 2 years!

Plus I spent nearly that much through Non-Amazon purchases. So if we apply the same 3% (it’s about average for Ebates), I easily could have made $68.73 in the last 2 years using Ebates.

I missed out on all this cash that I could have used to invest. Why didn’t I? Because I didn’t know how awesome saving money was, nor what Ebates was.

Conclusion

In the last week, I have realized what exactly Ebates is and their tons of partnership stores. This site is quite large and trustworthy at this point! Now with their Ebates Chrome Extension, I’m told how much cashback I can make at my favorite stores without even visiting the Ebates website.

I just wish I started this Ebates Review sooner and started making more cashback to start investing with.

To all my investor friends. It’s definitely worth a shot to earn some extra cash to start investing with.

Do you use Ebates?

Wallet Squirrel

Wallet Squirrel is a personal finance blog by best friends Andrew & Adam on how money works, building side-hustles, and the benefits of cleverly investing the profits. Featured on MSN Money, AOL Finance, and more!

www.walletsquirrel.com/
Page 2 of 41234

Our Favorite Article!

Get Wallet Squirrel Emails!

Read This Next:

  • 2022 December - Wallet Squirrel Income Report Income Report – December, 2022January 3, 2023 - 6:12 pm
  • The Best Payment Methods To Survive and Grow Your E-Commerce BusinessSeptember 6, 2022 - 1:09 pm
  • may-2022-income-reportIncome Report – May, 2022June 7, 2022 - 8:30 am

Directory

  • 70 Creative Ways to Make Money + How Much
  • About
  • Blog
  • Contact
  • Income Reports
  • Portfolio
2021 © Copyright - Wallet Squirrel - powered by Enfold WordPress Theme
  • Pinterest
  • Facebook
  • Twitter
  • Awesome Blog
  • Disclaimer
  • Contact
Scroll to top