Wallet Squirrel
  • Home
  • About Us
    • About Us
    • All Our Blog Posts
    • Media Kit and Pricing
    • Contact
  • Ways To Make Money
  • Income Reports
    • Income Reports
    • Our Total Savings
  • Search
  • Menu Menu
  • Pinterest
  • Facebook
  • Twitter

Posts

Ebates Review – Why I Wish I Started This Two Years Ago

April 27, 2017/2 Comments/in Earn Extra Money, Review, Save Money /by Wallet Squirrel

Who does not love saving money? Ebates is the way to earn money back after your purchase. Learn from this Ebates review if the application is right for you!

Ebates Review – Why I Wish I Started This Two Years Ago

Three weeks ago, I received a message from my buddy Cameron over at SquirrelBox suggesting to do an Ebates Review. I initially scoffed because I DON’T NEED ANOTHER APP!

You, like me, have seen “Ebates” pop up on your social media and thought the same thing. So let me explain what Ebates is.

SPOILER: It’s awesome, and not just another app.

Ebates Review – What is it?

Ebates is an online company who partners with over 2,000+ stores (many popular stores you regularly shop at). Whenever you go to one of your favorite stores, like Amazon, from the Ebates platform and make a purchase. Amazon assumes you would have only visited their site because of Ebates and gives Ebates a 4% commission. Then Ebates passes on those savings to you, and gives you 3% cash back for your purchase.

Ebates is essentially an affiliate company that pays you to visit their site first before you start shopping.

My Experience Making Cashback with Ebates

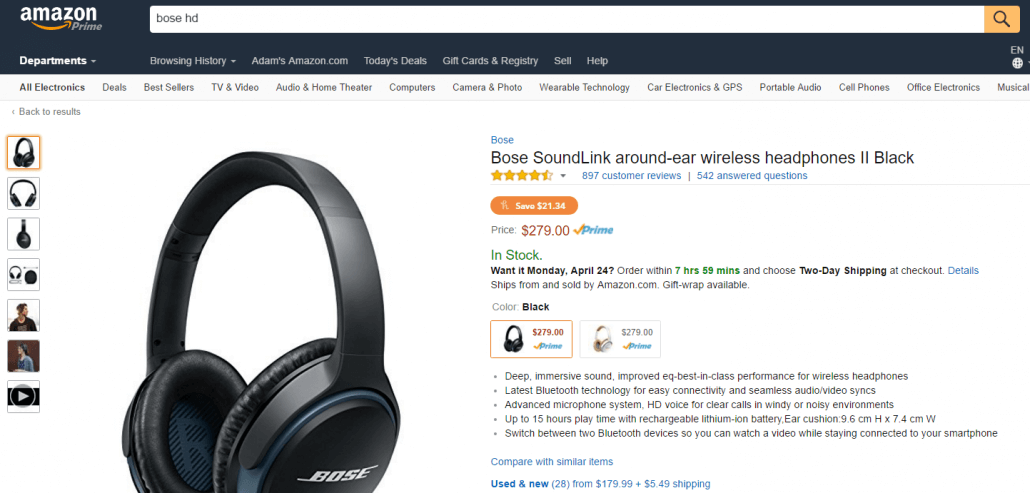
I’m running the Bolder Boulder in 5 weeks and I need new shoes. I’ve used the same running shoes (type & size) the last 7 years, so I’m going to buy them online.

Here’s my process.

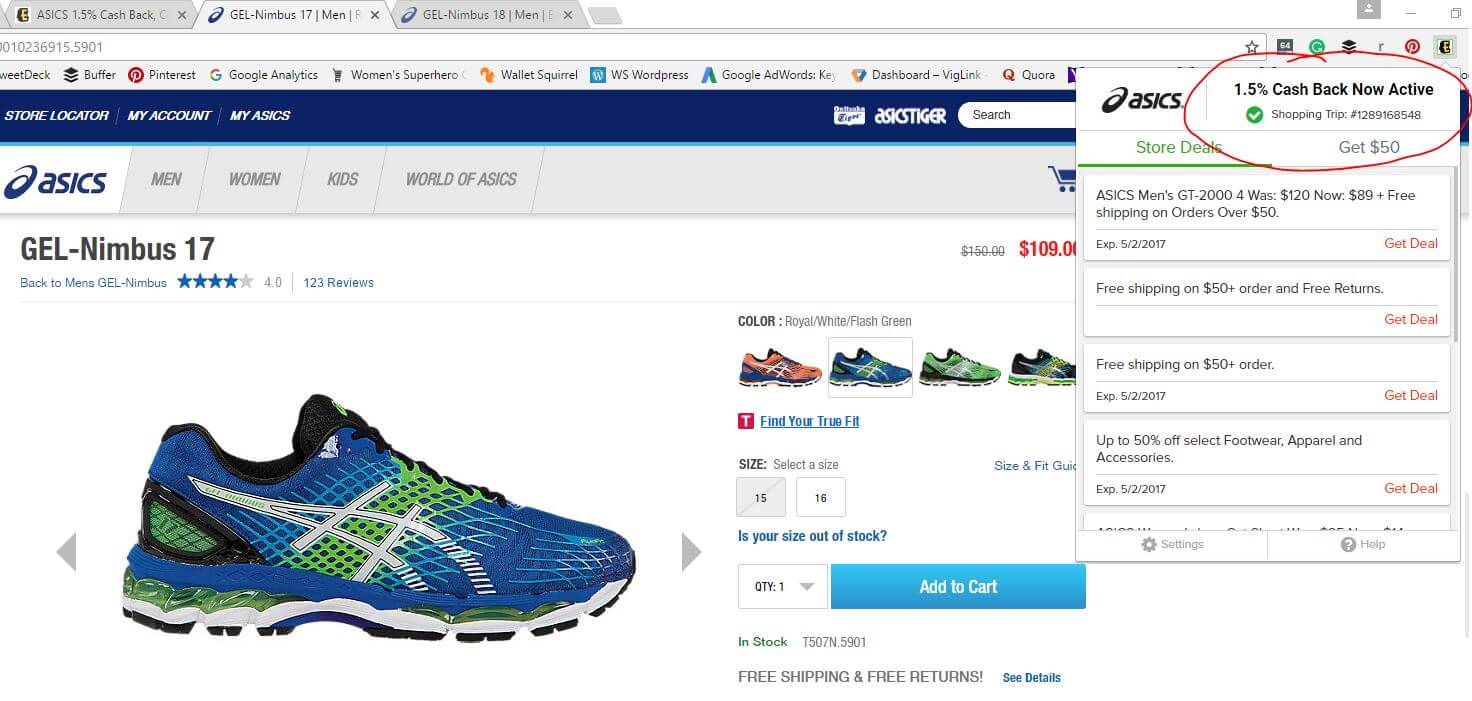
I go to Ebates.com and search for ASICS since I’m going to buy a new pair of ASICS from their online store. Sure enough, the ASICS store pops up and Ebates tells me right away that their partnership provides me 1.5% cash back on purchases. Cool!

Ebates Review - Asics Page


In addition, Ebates also has all of ASICS best deals right now. Also Cool!

Ebates Asics Page Deals


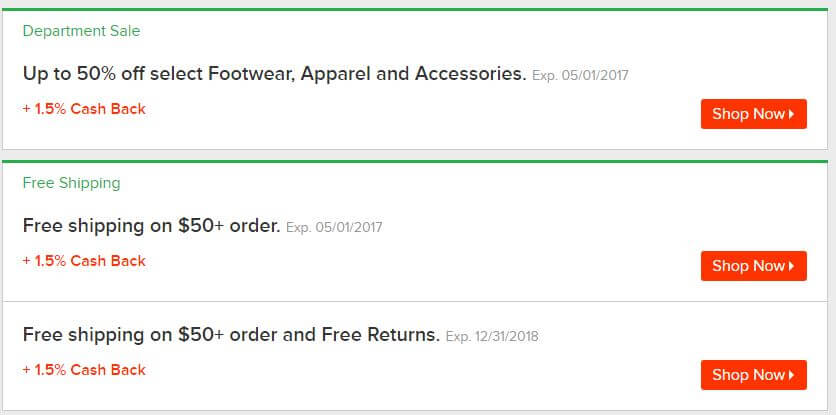
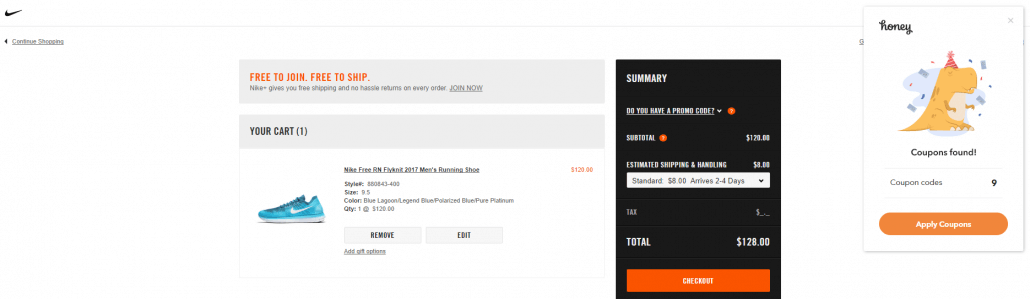
It doesn’t matter which deal you select, these are all just notifications. Any of them you select “Shop Now” will just send you over to the actual ASICS Homepage. You’ll see a loading screen like this.

Ebates Review - Sending Page

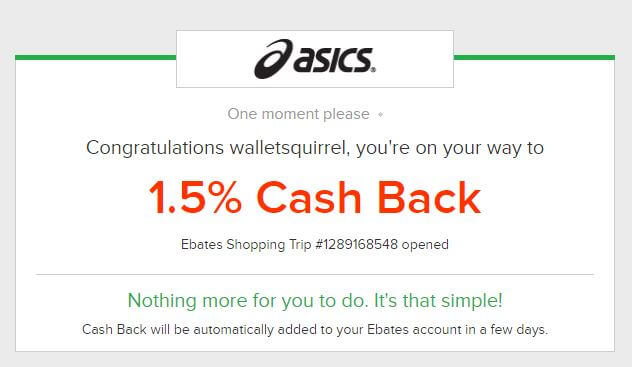
This entire process takes 30 seconds, now you’ll be on the ASICS page and anything you buy, you will make 1.5% cash back. Plus if you have the Ebates Chrome Extension like me, you’ll be reminded in the top right, how much you’ll save.

So as I look at my costly shoes, I’ll be reminded to of my 1.5% cash back on my $109 running shoe. So I’ll make $1.64 through Ebates on this purchase. I’ll make more since it’s my first purchase through Ebates and I used Cameron’s affiliate code (we’ll get to that in a second).

Asics Shoe Purchase


Remember, I use my 2% cash back credit card for everything, so I’ll gain an additional 2% off the purchase + plus the 1.5% from Ebates. Wahoo!

When does Ebates pay me?

Every time you make a purchase (like a new pair of ASICS), Ebates will hold onto your cashback rewards. The companies, like Amazon, ASICS, Walmart, pay Ebates and Ebates pays you, quarterly. So 4 times a year, you’ll receive a check from Ebates. This can also be PayPal or you can donate it to a charity or organization.

Here is their quarterly payout schedule:

Ebates Payout Schedule

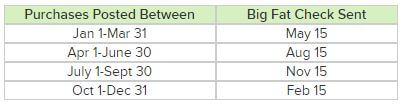
If your account is less than $5.01, Ebates will roll that balance into next quarter’s payout. It just a lot of processing fees for them, so they do $5.01 minimum payouts. I can’t blame them for that.


If you’re thinking that my $1.64 is too small for a payout, I’m actually at $11.64 because I used a friend’s affiliate code and earned $10 extra dollars. Use my affiliate code for your $10 extra dollars.

PLUS any cashback you recieve from Ebates isn’t taxed because the IRS considers “cashback” as a “discount” to your purchase like coupons. That’s why when you sign up for Ebates, all you need is a email, password and address for them to send your “big fat check” (their phrasing), not tax forms for you to fill now.

How do YOU sign up for Ebates?

It’s easy, go to Ebates here and enter a quick email and password. No more info than that. It takes less than 30 seconds and you can start looking around their marketplace and checking out all their partnerships. You’ll only have to add your address once you’re ready to cash out.

Use my Affiliate Code!!!

If I’ve educated you enough about Ebates to at least check it out. PLEASE use my affiliate code. This way YOU will earn an extra $10 at payout and it gives us at Wallet Squirrel an extra $5 through their affiliate program, so we can pay for things like internet and electricity.

I would never recommend something unless I REALLY like it and I’m a fan of after this Ebates review. In fact, wish I started using it 2 years ago when I first started to really get into Online Shopping.

Sign Up Today For Your $10 Gift Card

I would have $68 if I started using Ebates 2 years ago.

I wish I did this Ebates Review 2 years ago when I first started Online Shopping. I know I’m a late bloomer. My parents told me that hackers would steal ALL my info and identity, so I was terrified. Since then I’ve learned how security works, feel more secure against Nigerian Princes and now LOVE online shopping!

In the last 2 years, on Amazon alone, I have spent $1,145.64 according to my purchasing history. So since Ebates has 3% cashback on Amazon.com. I could have made $34.36 from Ebates in the last 2 years!

Plus I spent nearly that much through Non-Amazon purchases. So if we apply the same 3% (it’s about average for Ebates), I easily could have made $68.73 in the last 2 years using Ebates.

I missed out on all this cash that I could have used to invest. Why didn’t I? Because I didn’t know how awesome saving money was, nor what Ebates was.

Conclusion

In the last week, I have realized what exactly Ebates is and their tons of partnership stores. This site is quite large and trustworthy at this point! Now with their Ebates Chrome Extension, I’m told how much cashback I can make at my favorite stores without even visiting the Ebates website.

I just wish I started this Ebates Review sooner and started making more cashback to start investing with.

To all my investor friends. It’s definitely worth a shot to earn some extra cash to start investing with.

Do you use Ebates?

Wallet Squirrel

Wallet Squirrel is a personal finance blog by best friends Andrew & Adam on how money works, building side-hustles, and the benefits of cleverly investing the profits. Featured on MSN Money, AOL Finance, and more!

www.walletsquirrel.com/

Couponing at Its Best Using the Honey App

April 24, 2017/0 Comments/in Review, Save Money /by Adam

Couponing at Its Best Using the Honey App

Just a few months ago I stumbled upon an amazing extension for Google Chrome. This extension is called the Honey App. The Honey App sits in the background while you shop online to help you find coupons automatically. Essentially it is your own personal couponing assistant.

I must disclose right away, you will not be doing any extreme couponing with the Honey App. So you will not end up getting 728 tubes of toothpaste delivered to your front door that you only paid $1.94 for. Rather this application allows you to save some dollars that you would not know about otherwise.

https://www.walletsquirrel.com/wp-content/uploads/2017/04/honey-landing.mp4

Couponing with the Honey app is so simple. Video courtesy of Honey.

Setting Up the Honey App

As mentioned earlier, the Honey app helps online shoppers find coupons automatically. Honey only takes five minutes to sign up for and install.

To get started, head over to the Honey website.

In the top right hand corner of the page click on “Join Now”. Enter your email and a password. They also allow you to sign up using your Facebook account if you prefer that method.

Next, click on the giant orange “Get Honey For Free” button. This will install the Honey App extension for the browser you are using.

After that, you are done and ready to do the best couponing ever! Now you can head over to Amazon to get the best deal ever on that JL421 Badonkadonk Land Cruiser/Tank that you have always wanted.

Using the Honey App

Really there is not much to say here. Once installed Honey does all of the work from there.

If I am on Amazon, you can see potential savings within each product page. Honey will tell you either you are getting the best deal or if you need to go to another Amazon seller for the best deal.

Bose

Showing how you could easily save $21.34 on some Bose Headphones on Amazon.


Bonus Points: The Honey app will also give you information about the price history of the product. This will allow you to see if you really are getting a good deal or not. Maybe the price of the product jumped up in the last month so you know to wait for it to drop again.

When shopping outside of Amazon, the Honey App will pop up during checkout in the right hand corner of the browser telling you that it has found some coupons. Click the “Apply Coupons” button to watch the magic start. Honey starts scanning through all of the coupons it found and tries to apply them. Once complete, Honey notifies you if any of them were a success or not.

Results

The results have varied for me. I really have not had much success outside of Amazon. Since the Honey app is fully integrated with Amazon, it works really well there. The application tells you what other sellers are offering better deals. This allows you to easily hop over to their product page to check out the deal. Just be careful, if you are a Prime member, make sure this other offer is eligible for that service or else you might end up spending more in shipping.

Honey found 9 coupons to save some money on these sweet Nike shoes.

Honey found 9 coupons to save some money on these sweet Nike shoes.

Outside of Amazon my success has been minimal. After scanning through the coupons that pop up, I find more often most of the coupons fail. This is because Honey scans through all of the couponing websites such as Retail Me Not. Most of the coupons are out of date from these site. I have mostly received free shipping but hey that is five or ten bucks in savings right there.

My Thoughts

I absolutely love Honey! It is truly passive. Typically I forget it is even running in the background until it pops up saying that I could save some money during check out. I personally only have experience with the Honey App within Chrome. According to their website it does work on most major browsers.

Browsers

The Honey App works on most major internet browsers.


For anyone that likes couponing, the Honey app is a must for your online shopping. For anyone who loves saving money this application is still a must for your online shopping.

Looking to make more money? Check out our list of Ways to Earn More Money. We continue to explore new ways to earn money. This list has ideas and links to other articles to the ideas we have tried.

A UserTesting Review By a Frustrated Applicant

April 10, 2017/21 Comments/in Earn Extra Money, Review /by Adam

A UserTesting Review By a Frustrated Applicant

Let us start this UserTesting review at the beginning to give you some context what they do.

A glance as to what UserTesting does.

A glance as to what UserTesting does.

Basically UserTesting will do a comprehensive review of a company’s website.

UserTesting will have a “Company A” approach them saying, “Hey, we are not sure if our website is very good. Can you help?”

User Testing takes over by asking, “What are you worried about with your website?”

Now the “Company A” could say that they are worried about their navigation or is information is easy to find? These concerns are then transformed into tasks for a website reviewer to try out.

Enter the UserTesting website reviewer, what I was hoping to try out.

Everything done by the website reviewer is recorded by UserTesting’s on their application. This application records what the reviewer is saying as they talk through their actions, thoughts, and process. Also, the application records the screen movements and actions the reviewer performs. I’m not exactly sure what happens after the review is completed. I would assume that the company gets the responses and data after some vetting/cleaning up process. The video below explains the whole process in their words.

My Experience Starting Out

When I first heard about UserTesting.com about a month ago I was excited. I thought to myself, “Man, they are going to pay you a decent amount of money for 20 minutes of work to review websites? I’m in!”

Not only was I excited for the additional income but I was excited to learn.

For me, creating websites is a passion. Being able to review many different sites would have given me the opportunity to see what other people are doing right or wrong. Personally, I was the most excited to learn! Plus, I thought I could make an awesome UserTesting review for the readers of Wallet Squirrel.

Sign Me Up!

Fast forward to this past week. I was finally able to get started on my application to be able to review websites and start the UserTesting review.

View of the sign up page.

UserTesting Review: Sign-Up Page.

My adventure started off with excitement. To begin with, they ask everyone to try out a test review to make sure every applicant can speak clearly and has the right equipment set up. I hopped on their website where I submitted my email address to start the process. Once the email arrived I could click on a link provided to begin the sample test.

Email I received to start the process.

UserTesting Review: Email I received to start the process.

Sample Test

This link in the email takes you to a webpage where I could download their application. Once downloaded, I could follow the steps to get it installed. The initial process was super easy and simple. After completing the install, I hit the continue button which took me to the next page. Because most people are not sure what to expect, UserTesting provides a link to a previous applicant’s sample video. This was nice to have so I could get my bearings for my own sample test.

The initial process was super easy and simple. After completing the install, I hit the continue button which took me to the next page. Because most people are not sure what to expect, UserTesting provides a link to a previous applicant’s sample video. This was nice to have so I could get my bearings for my own sample test.

This was nice to have so I could get my bearings for my own sample test.

Testing out the microphone. It works almost to good.

Testing out the microphone. It works almost to good.

After taking a peak at the example, I hit “Launch Recorder” to have a go at it for myself. The application opens with a test for your microphone. Annoyingly there are more pop ups to go through before I finally got to where the application is recording. Reading the instructions, the first task is to watch a short two-minute tutorial video. This video is nice as it goes through the process with you and gives you some more tips on how to use the UserTesting Application. Once complete there are three questions to answer. These are simple multiple choice questions, so do worry much about them.

The application opens with a test for your microphone. Annoyingly there are more pop ups to go through before I finally got to record. Reading the instructions, the first task is to watch a short two-minute tutorial video. This video is nice as it goes through the process with you and gives you some more tips on how to use the UserTesting Application. Once complete there are three questions to answer. These are simple multiple choice questions, so do worry much about them.

Reading the instructions, the first task is to watch a short two-minute tutorial video. This video is nice as it goes through the process with you and gives you some more tips on how to use the UserTesting Application. Once complete there are three questions to answer. These are simple multiple choice questions, so do worry much about them.

Actual Tasks

Finally! After clicking through SO many pop-ups and windows, I made it to the actual sample tasks.

I landed on the National Air and Space Museum’s website to review. My first task is to find a map with a layout of the museum in DC. As I explore through the logical places for this layout map I talk through my process and thoughts about the task. Once the map was finally found and my thoughts shared, I get to click next for the second task.

The home page of the National Air & Space Museum Website.

The home page of the National Air & Space Museum Website.

The second task wanted me to find what holiday the Air and Space Museum is closed. With this task, I looked around the website some more. This one was a little more tough to find because of the overall structure of the site is goofy. But at last! I found it! I gave my two cents about the overall site structure and then moved on.

But at last! I found it! I gave my two cents about the overall site structure and then moved on.

Once the last task was complete, I could hit “Done” to stop the recording. Next there were a few written questions to answer such as, “What specifically made it easy or difficult for you to find what you were looking for?” I inputted a detailed answer for each one because of the higher the quality of your review, the more likely you are going to get more reviews.

After answering those questions the UserTesting application starts uploading the review.

Redo Part One

Excluding allpop-ups pop ups, this is where my UserTesting review started to take a turn for the worse.

It was not an hour later after submitting my first video that I got an email saying to redo my submission. As you can see this email is very vague as to why I had to redo my test sample. I thought, “Okay, maybe the room was too loud or I did not talk loud enough.” So, I sat down, made sure the room was shut tight, and cleared my throat. It took me about 15 minutes to finish this submission.

As you can see this email is very vague as to why I had to redo my test sample. I thought, “Okay, maybe the room was too loud or I did not talk loud enough.” So, I sat down, made sure the room was shut tight, and cleared my throat. It took me about 15 minutes to finish this submission.

My first rejection email.

UserTesting Review: My first rejection email. Notice how vague it is.

Redo Part Two

At dinner, I was all excited that I had not received a rejection email yet.

Sadly, this excitement did not last long though. As we were just cleaning the dishes another rejection email came in. I started to get a little more frustrated this time as it was the same vague email.

Determined to get my application approved I sat down, yet again, to do the test sample. This time I focused harder on what I was saying during my exploration. I tried to simplify my review and be more clear. After submitting it this time I got my hopes up. I thought I had it this time.

My first rejection email.

UserTesting Review: My second rejection email.

Redo Part Three

It was not till mid-morning the next day that I heard back with, yet again, another rejection email.

I was kind of angry at this point because I did not know what I was doing wrong. The silly rejection emails do not tell you ANYTHING.


My third rejection email.

UserTesting Review: My third rejection email.

I only wanted some direction as to what was I doing wrong. This would be the fourth time I was to do the test sample.

After looking around some more through the test sample I determined that I might be looking for the wrong map. I kept looking for the location map when they wanted the layout map. Knowing this I started the application all over again, for the fourth time, did I mention that part? Once done, I felt very confident that I would get it. I thought I would have an awesome article to write about making money by reviewing websites.

Sure enough, I was right. I was not completing the task right. If the emails were a little more detailed, the sample test might have only had to redone once instead of three times!

Finally, A Different Email

Later that evening, I was so happy to see a different email come in from UserTesting with the subject line, “UserTesting – Your application to UserTesting.” Thinking to myself, I thought, “Man, this has to be it! I did it! I did it!”

I open the email and all my hopes and dreams were crushed (might be over overdramatizing). The email said they have more applications than they can accept so they couldn’t invite me to join the panel.

The final rejection letter after figuring out what I was doing wrong.

The final rejection letter after figuring out what I was doing wrong.

Are you kidding me?!?!? I spent two days recording the sample test four times and just now I am hearing that they are not taking any more applicants. Why couldn’t they say this on their website? I couldn’t believe it. I was very angry at the company at this point.

via GIPHY

Okay, Adam, breath…it is okay.

Conclusion

To conclude the UserTesting review, this process was very frustrating. Though UserTesting has ironed out most of the experience there are still some major wrinkles that need to be smoothed out. For one, they need to provide better emails as to why something is rejected. I do not see why this would not be hard to do. From my understanding an actual person reviews the sample tests so why can’t they be a little personable.

Secondly, they need to close their application link if they are not accepting anymore applications! This made me upset when they pushed me to keep redoing my sample test just to tell me something they already knew, they weren’t taking anymore applications.

Please fix this UserTesting!  For me, it comes off as they do not care about their reviewers even though these people make up half of their business.

For me, it comes off as they do not care about their reviewers even though these people make up half of their business.

To give some positive feedback within this UserTesting review, they do have a very nice website. It makes signing up very easy. The application used to conduct reviews is very slick and simple (though there are a lot of popup windows to click through). They do make the process very easy to perform so anyone could conduct a review. Sadly, they have the smudge marks, listed above, that ruin the program for me.

via GIPHY

Other Reviews

Andrew and I are constantly reviewing different methods to earn more money. Head over to the Blog or our How to Earn More Money section to read more reviews. If you have any thoughts on something we should review shoot us a message.

The Achievement App Review – How to Earn More Money in 2018

March 13, 2017/20 Comments/in Earn Extra Money, Review /by Adam

Being outdoors participating in many different activities is one of my favorite things in life. This is one of the biggest benefits of living in Colorado, I can be active outdoors year-round. I have all of the gear. The running shoes, the fitness watch, the bike, the skis, the backpacking gear, and so on. I am set when it comes to playing outside. Today, together, we explore how to earn more money in 2018 with the Achievement App. We will look at the in’s and out’s of the application to decide if it is right for you.

Side note: I absolutely love my fitness watch from Garmin. It is a little pricey but allows me to track ALL of these activities when most do not. Plus, I can still wear it to business meetings after switching to the metal band. Alright, sales pitch over now back to your regularly scheduled program.

The issue I have is the lack of motivation to get up in the morning to work out. I think a lot of people would agree with me. No matter the time of day, it is tough to get that motivation. If this was not the case there would be too many David Hasselhoffs and Pamela Andersons running down the beach in slow motion. Well, how do we get help for more motivation? Enter the Achievement App.

What is it?

The Achievement App allows you to earn money from your fitness adventures. This includes walking, running, biking, hiking, and so on! Every activity you record the application rewards you with points depending on how intense and long it was. The people over at the Achievement App have even thrown in some curve balls as to how you can earn points. These include logging your foods on MyFitnessPal or tweeting healthy thoughts on Twitter. My favorite one though, they will reward you for sleeping!

In total there are 27 apps (Their website says 40+ but I only count 27 in the Apps pages) you can sync your Achievement app to in order to earn more points. These are not obscure apps either, they include very popular and well-developed applications so most people can get connected. These applications include the UnderArmour Fitness suite, Garmin Connect, Jawbone, Fitbit, Apple Health, Foursquare, Twitter, and so much more!

Why do they do this?

You must be asking, “Why are they doing this?” Achievement has partnered with several health research companies who in turn make the rewards possible. With every 10,000 points, you earn they will pay you $10. According to their website, “There’s no limit to how much you can earn.” So to simply put it, they are paying you for your data so they may sell it to research companies.

Some people might find it scary that researchers are going to be looking at your data and it is a lot of data! I completely understand your hesitation. The Achievement App does not disclose a lot of information about this part of the process. It would be nice if they answered a series of questions such as…Who is doing buying this data for research? What are they researching? Is there any personal information they look at such as names? I couldn’t find any answers to these questions within their Terms of Service agreement. Let me know if you do find anything. Achievement does have 1,000,000 users but I would suspect that they could have more if they answered the above questions.

My Thoughts

I love the application they have designed. It is clean, simple, and efficient. Syncing up other applications to it for tracking is a very easy process. Within a couple minutes, I had my Garmin, Twitter, and MyFitnessPal accounts all linked up. They do not have a dedicated Android application yet but the web application is so well designed I did not even notice.

Update (8/15/2017): Achievement has come out when an Android application since I first wrote this review. Check it out here.

Unfortunately, this is where the positive feedback ends.

My main issue is it takes A LONG time to earn 10,000 points. I can go for a for a long bike ride and earn only 51 points. On average I walk 7,000 steps which get me about 20 points. That is only 0.2% of the total goal!

Another issue for me is the inconsistency of the point rewarding. I can go for a mile long warm-up run and earn eight points. After the run, I complete a 53-minute long Insanity session and earn only six points. Now we know Insanity is A LOT more intense than a mile long run so it should be worth more points. At first, I thought maybe it was the lack of data compared to the run. So I started wearing my heart rate monitor to provide more data but nothing changed. This lack of consistency is really discouraging especially after an intense workout.

Yet, Another Update (8/15/2017): I feel like this still is true. I am seeing weird point distrubutions for similar activities.

Conclusion

All in all, I think the Achievement App is an interesting way on how to earn more money in 2018. If you are very active you might earn enough to take your wife out to lunch (I do not think you will earn enough for dinner). For me, seeing the points creep up at first was very motivating but then I realized how slow it was going that extra boost of motivation started to disappear.

To put it in a monetary perspective. According to Achievement’s website, they have paid out over a half million dollars so far! That is a lot of money! Let’s do some math before you get too excited about that number though. As mentioned earlier, the Achievement App has a million users, that means an average user has only earned fifty cents. That is it.

Overall, I think they have more work to do to make this application a viable way on how to earn more money in 2018.  They need make this application more consistent with how it awards points.

Also, I believe they need to make the point earning a tad bit quicker. Maybe that aspect is just me but I joined Achievement back in December 2016. Over the past three months, I haven’t even hit 2,000 points yet!

Final Update (8/15/2017): I have had a very busy summer between hikes, bike rides, daily walks, and so on. I am still only 3,391 points! Even though this is frustrating, the next paragraph is still true.

I do have to remember, I do not have to do anything that I do not normally do to earn these points. It is truly passive income with Achievement collecting data from data that I already collect myself. Now I am getting paid for that data, even though that dollar sign is very small.

How to Earn More Money in 2018

Now you know a little more about way #73 to earn more money with the Achievement App. Head over to our Ways to Make Money list to check out other ways how to earn more money in 2018! We will continue to try out and review these ways throughout the year for you. If we are missing something on the list and you want to have us review it shoot us an email or tweet (@WalletSquirrel)!

Cheers!
-Adam

How to Earn More Money – Donating Plasma

March 6, 2017/0 Comments/in Earn Extra Money /by Adam

Introduction

Hello Everyone! Before I get to today’s main way to earn more money, donating plasma, I wanted to introduce myself. As a lot of you already know from Andrew’s introduction of me from his post last week, I am Adam. If you didn’t see his introduction, go check it out now. It is a really good read! Don’t worry, I won’t go anywhere, I’ll still be here when you get back.

You back? Great! I hope you enjoyed that article as much as I did.

Anyways, back to what is important, me! As I’ve already mentioned, I am Adam, the newest and greatest (shhh don’t tell Andrew) contributor to Wallet Squirrel. I am very excited to work alongside my best buddy Andrew making great content for you while learning in the process.

My goals here are to learn more about becoming financially free and to become that. My wife and I have a lot of debt (car, student loans, and house) that we want to break free from. I want to include you in on this journey to paying off our debt!

A little about me. I am married and we have a four month old. We also have two dogs, a lab-retriever and a husky. Living in Denver, Colorado allows our little family to do what we love the most, spend time in the mountains. We love to hike, climb 14ers (Mountains above 14,000 feet in elevation), and to camp. One of my favorite hobbies is photography so you will be seeing several posts from me about it and how you can make money with your camera. Be excited!

Earn More Money With Photography

A little self promotion of one of my photographs


I guess I’ll stop rambling and get to what you are really here for. Way #72 to earn more money by donating plasma.

Earn More Money – Donating Plasma

A lot of people cringe at the thought of having a 12 gauge needle moving towards their arm. I don’t blame them, it can be a very nerve racking process. Especially when a trainee would come to stick you but most weeks the experience was great. I am here to walk you through the donation process to help ease those nerves.

Back in college donating plasma was my main income for a few years. Twice a week one of my roommates and I would go to Biolife Plasma in Ames, Iowa to donate plasma. Typically we would earn between $50 to $70 a week for our plasma and time.

So let’s walk through what my typical visit was like. Keep in mind, I have experience with only one facility and your local donation center might vary.

When I initially started I had to take a physical to make sure I was fit enough to donate. This is not a traditional physical that you get at the doctor, so do not worry about that. It takes about an hour to complete between all of the paper work, the million and one questions they ask you, as well as the general physical health checkup they perform. The physical needs to be repeated every year, which was my least favorite part of the experience. Not because it was hard or anything like that, it was just really annoying.

Now that the initial physical is complete and I was approved the rest of the visits were easy. I would walk through the front door and sign in at the front desk. This included answering a bunch of questions on a computer. Some examples are. Have you visited certain countries within a particular time frame? Were you sick recently? Did you donated blood recently? Then I would go sit in the waiting room for a little bit. A nurse would call my name to check my temperature, blood pressure, and verify so other items. If I had too high of temperature or blood pressure I could not donate for the day. If I passed, the nurse would take me back to the donating beds.

Once back there and settled in, a technician would come to stick my arm so the donation process could start. This is the part most people cringe about, don’t worry about it. These technician do go through a thorough training process. Out of the three years I donated, only a few sticks did not go too well.

Earn More Money - Donating Plasma

Technically this photo is of someone donating blood but looks very similar to the plasma donation process.

After getting hooked up I was able to relax during the donation process for the next thirty to forty-five minutes. This is when I would read/study or watch a movie. I really enjoyed this part of the donation process as you were literally forced to relax. When done and unhooked, I went to check out, sign up for my next donation time, and get paid! The whole visit took about an hour and a half.

Payment wise, Ames was a smaller market so we only got $50 to $70 a week for the donations. We were limited to two donations a week each time. They would pay $30 for the first time and $40 for the second visit. Some bigger cities paid a lot better. It was rumored that people in Kansas City were getting $130 a week!

Conclusion

For anyone with a few extra hours in the week and looking for more money I highly recommend checking your local plasma donation center. This is a fairly easy way to gain some extra income. It is mostly a painless process that allows you to get other work done during the process. If I missed anything about the process or you have a story about your own experience, give a comment below.

Now that you know a little more about way #72 to earn more money, donating plasma. Head over to our comprehensive list to check out other ways you could earn more money in 2017! We will continue to try out and review these ways throughout the year for you. If we are missing something on the list and you want to see us review it shoot us an email or tweet (@WalletSquirrel)!

Cheers!
-Adam

Holy Crap! Interest Checking Accounts are a Thing

February 23, 2017/7 Comments/in Earn Extra Money, Review /by Wallet Squirrel

Until two years ago I didn’t know there were such a thing as an Interest Checking Account. I had a standard Wells Fargo checking account for 12 years making me zero money. Literally zip, so imagine my surprise when I discovered there are checking accounts out there that pay you interest like a savings account.

What is an Interest Checking Account?

It’s essentially a regular checking account You can write checks, use debit cards or withdraw from ATMs but while your money is in the account, you’re earning interest like a savings account.

Interest Checking Account

Regular Checking Account vs. Interest Checking Account

How much can you earn in an Interest Checking Account?

It isn’t much, but better than zero. I have an account with Ally Bank and my Interest Checking Account makes 0.10% interest. To give you an idea. I keep around $4,000 in my checking account at all times. $2,000 is

To give you an idea. I keep around $4,000 in my checking account at all times. $2,000 is for my emergency fund and $2,000 for my monthly expenses. So that’s $4,000 sitting in my account making about 0.38 cents per month. See my Income Reports to see how it changes per month.

It’s not much, but over the last year, my Interest Checking Account made $3.66. That’s what I entered on my taxes last week.

My Personal History

Now $3.66 is more than I made on my Wells Fargo Checking Account, EVER! Keep in mind, I don’t mean to hate on Wells Fargo, but they simply never told me an Interest Checking Account was a thing.

They were like the cool kids in every high school (likely named Chazz). You wanted to hang out with them, even though you knew you they were dicks and there were better friends out there.

At Wells Fargo, if my checking account ever made interest, they kept it. Even my Wells Fargo Saving Account at 0.01% was earning less than my current Interest Checking Account. If I kept my $4,000 in Wells Fargo Savings Account for a year, I’d be left with $0.40 at the end of the year. THAT’S THEIR SAVINGS ACCOUNT!

Do a lot of Checking Accounts earn you interest?

Actually, most checking accounts I’ve encountered do not earn you interest. This is why I was so surprised when I discovered there are a few that do.

Many of my friends have a balance similar to mine with $4,000 in their account and some of my friends have up to $60,000 sitting in their checking account because they don’t know what to do with it. If you have that much, you should move it over to a savings account at least and hire a financial manager. I get the fear of the stock market, but there is no reason to keep that much in a checking account, especially not making you interest.

Conclusion

I’ve been wanting to do this post for a while now. It’s cool to share with people, who like me, didn’t know about Interest Checking Accounts. They exist! It’s not a lot of money, but it all adds up!

PS. I’m in no way sponsored by Ally Bank here. This is just my personal experience so far and if they start to F*!k up, you’ll hear about it

I hope I taught at least one person something new!

Wallet Squirrel

Wallet Squirrel is a personal finance blog by best friends Andrew & Adam on how money works, building side-hustles, and the benefits of cleverly investing the profits. Featured on MSN Money, AOL Finance, and more!

www.walletsquirrel.com/

Naming Force Review: Make Money Naming Start Ups

February 16, 2017/25 Comments/in Earn Extra Money, Review /by Wallet Squirrel

Naming Force is a website that runs naming contests for up and coming companies/start-ups looking to generate a creative name for their company. I’ve been testing this website for the last month to see what it’s about, so here is my Naming Force Review.

What is Name Force?

NamingForce.com solves a problem. When a company doesn’t know what to call themselves, they’ll run a naming contest. A new company will post a description of what they do and some keywords they feel describe their company. They do this by setting a reward, typically $100 – $200 for a winning name. Then the Name Force community will submit various names based on company descriptions.

At the end of the naming contest (usually lasts a week). The company is required to select one winner and the you’ll receive the $100 – $200 reward. Simple.

My Experience

Setting up an account was easy and they offered videos on how to navigate the various contests but I skipped those. However in hindsight, I recommend them. They would have been very beneficial as I was confused starting off.

Keep in mind, after registering, you’ll have a 3 day waiting period before they let you start submitting to contest and you’ll only be allowed to 2-3 entries per contest. You start off as a “Private” (yes, they follow military terms for seniority). The longer you’re on the platform, you’ll move up and gain access to more contests with more entry opportunities.

Once in themarketplaceace you’ll see a list of contests with the cash prize on the left and the amount of submitted names on the right:

Naming Force Review - Contest Menu

Naming Force Review – Contest Menu

Select a contest and check out a paragraph description of a company. That’s all you get. You’ll be given a small description of what they do and what makes them unique. Then you’re asked to create a name.

Keep in mind, they usually want a name that isn’t trademarked and has an available .com domain. So what I did, was come up with names that have an available domain. Usually, these names aren’t copyrighted since no one has bought their website domain.

To check if a name has a “.com” website domain, I used GoDaddy to see available website domains.

Go Daddy Research

Contests:

I did about 5 contests total. Here is one example:

Contest Description “We are a brick/mortar organization that helps companies create reviews for their company and/or products” They mentioned they were a tech company but that was the general gist.

I hopped on GoDaddy and spent 20 min finding some great names for this company with that slim description. I narrowed down the choices to two and submitted them on the form at the bottom of the contest page, which looks like this.

Naming Force Review - Name Submission Form

Naming Force Review – Name Submission Form

Naming Force Review Pros:

It’s easy to sign up and anyone can enter a contest, potentially earning $100 – $300 if your name is selected.

Plus it allows you to be creative on your own time. Each contest last about a week or two, so you have some time to think about your names.

Naming Force Review Cons:

It’s really hard to win. In the marketplace, it shows you how many other names have been submitted. At a minimum, it was around 600 names per contest. So you’re competing with many other great names for a prize, and there can only be one winner. I personally don’t like 600 to 1 odds. If that’s the case, I’ll go back to playing lottery tickets.

Conclusion:

A month later, I never won. Not one contest. I feel I had some awesome names but they must not have struck a chord with the reviewers and that’s what matters. So in total, I did 5 contests at an average of 20 min each. I spent 1 hour and 40 min for nothing. It was slightly exhausting because I put a lot of thought into each name and none of them won.

I do not recommend this site as a way to earn money. My Naming Force Review revealed that it’s just not a consistent return for your time. You could easily continue to submit names for a year and still never win.

On the other hand, if you’re a start-pp, this is a great opportunity to get some awesome name ideas. This is a marketplace full of creative people with a history of naming companies. They’re willing to do the research to find creative names with available domains and trademark free brand names. You will pay $100 and get an average of 600 name submissions. You’re essentially paying around $0.17 per name within a 1-2 week turn around. The companies getting the names are the real winners in this deal.

Have you tried this, did you win? I would love to hear from someone who won because it’s a cool idea but sadistically frustrating to creative people who lose.

Wallet Squirrel

Wallet Squirrel is a personal finance blog by best friends Andrew & Adam on how money works, building side-hustles, and the benefits of cleverly investing the profits. Featured on MSN Money, AOL Finance, and more!

www.walletsquirrel.com/

How To Sell Something on Craigslist and Make Money

January 26, 2017/9 Comments/in Earn Extra Money, Review /by Wallet Squirrel

I’ve never sold or bought anything off Craigslist before. This is my first experience from registering on Craigslist and selling a guitar. Here’s how to sell something on Craigslist and make money.

1. Go to Craigslist

Start by googling craigslist and your city (Denver for me). Your first google result will be the right Craigslist page. You can also go to Craigslist.org and select your city, but I find google did it faster for me rather than navigating their website. When you first get to their website, keep in mind its set up for buyers. You’ll be given options to search categories like “for sale items”, “housing (apartments)” and “jobs” and others.

2. Post to Classifieds

  1. You’ll see a “Post to Classifieds” on the top left of the website.

    post-to-classifieds

    Craigslist Homescreen

  2. You’ll be asked “What Type Posting is this?”. This is to categorize your posting, should it be a “Job Wanted”, “Apartment Vacancy” or “For Sale by Owner”. Since I am selling a guitar, I choose “For Sale by Owner”. You can also choose to give things away for free in lieu to sell something on craigslist.
  3. You’ll then be asked what type of item you’re selling. Again this is to help Craigslist decide where to place your ad. I choose “musical instruments- by owner”.
  4. Now enter your contact info and product description. This will be different for different items you sell, but same general idea.craigslist-for-sale-by-owner-form
    1. Contact Information – You really only need your email. They ask for your phone number, but I didn’t provide it. I figured if anyone wanted to get ahold of me, they can email me. It’s the same as texting which pretty much everyone does anyway. Especially anyone using Craigslist.
      Craigslist does a neat email thing where whenever someone sends you an email through Craigslist, it goes through a Craigslist server and hides the sender’s actual email. You’ll see a long string of characters for their email. When you reply, it’ll go to the right person, but this way, you can communicate without people seeing your email address and them seeing yours. Craigslist calls this “CL Mail Relay”. I used this option. (See email screenshot below)
    2. Product Description – Personally I kept this short and simple. People don’t need a long description. My entire description, as you can see from the screenshot below, is pretty short. Just make sure you use the “Keywords” you think people will be searching for, in your product title and description.
      You’ll also want to add a product price. Just do a simple search for what your item currently sells for new and compare its condition and what others are selling similar items for. I listed $100 for my guitar. Remember people use Craigslist to find bargains.
How To Sell Something on Craigslist and Make Money

How To Sell Something on Craigslist and Make Money

3. Responding to Potential Buyers

I had 6 people respond by email that they were interested. These 6 people responded within the first week it was posted. It seems after a week, your ad will get buried by newer post.

  • One person just sent me an email telling me I was dumb for selling my guitar. I deleted their email.
  • Three people just had simple questions about the guitar and that was it.
  • Two people wanted to meet to see it in person. (email below)


craigslist-email-jennifer

Potential Customer Email

4. Meeting with a Potential Buyer

Everything I’ve read online, always meet someone in a public place. You don’t want to be creepy and don’t want to meet creepy people.

After emailing back and forth with a potential buyer, we had to reschedule once because of her work schedule. It was a girl because her she signed her email with her name, Jennifer. She was buying the guitar for her mother. That seemed neat. I suggested meeting in the lobby of my apartment building downtown. It’s a nice lobby and public place so she would feel comfortable.

She arrived with her mother and daughter, either because she felt more comfortable with someone else or because the guitar was for her mother. Her mother inspected the guitar, had a few questions which I answered honestly. Then after 10 min of chatting, she asked: “what was the lowest I’d sell it for”. Which was an interesting haggling tactic to see if she could get it cheaper? This could potentially work, but I just said the advertised price “$100”. She then provided me a $100 bill.

I could have been skeptical of the large bill, but it looked legit and I had no reason think it wasn’t. That was it. I went upstairs with my $100 bill and they left with the guitar. The entire process was akin to selling a fruit roll-up to a classmate in the school cafeteria. It was easy.

100dollar

Final $100 Bill


What Happens if You Invest that $100

Since Wallet Squirrel is all about earning extra money and investing it, let’s see what would happen over 20 years if you invested that $100 in dividend stocks. Let’s assume 7% Market Average with a 3% dividend.

  • 1 Year
  • $110.14
  • 5 Year
  • $159.25
  • 10 Year
  • $244.54
  • 20 Year
  • $537.35

Hopefully this helped to explain how to sell something on Craigslist and make money. Will I do it again? Hell yea, it went so smooth and hassle free that I want to sell more items. I have a whole box of Pokémon Cards, anyone want them?

Wallet Squirrel

Wallet Squirrel is a personal finance blog by best friends Andrew & Adam on how money works, building side-hustles, and the benefits of cleverly investing the profits. Featured on MSN Money, AOL Finance, and more!

www.walletsquirrel.com/

Grammarly Review – Bloggers Best Friend for Grammar

June 12, 2016/13 Comments/in Business, Review /by Wallet Squirrel

Is it possible to love good grammar but be awful at it? YES, absolutely. Story of my life.

Now, while I am a stickler for good grammar, I’m not a jerk and anticipates calling people out on the wrong use of effect vs affect. It’s a pretty common mistake, but here’s the thing. It doesn’t have to be. Here is my Grammarly review.

For the last 8 months or so, I’ve been using a Google Chrome Extension called “Grammarly“. It’s been a huge life saver for me and it can absolutely work for you too. Specifically, I’m addressing other Bloggers and Website Commenters. You’re like 90% of my audience.

You can bully on YouTube comments all you want, but let’s use good grammar people.

Grammarly Review: What does Grammarly do?

Grammarly in essence is an online grammar checker. There are two ways to use Grammarly:

1. As you type within comment boxes online on any site, you’ll see a solid red underline as Microsoft Word but it’s Grammarly checking both for spelling and correct uses of words, commas, sentence structure, etc. You’ll see a nice little Grammarly logo, so you’ll know it’s working.

Here is the comment form I recently left on Dividend Diplomats blog, awesome blog check it out.

Grammarly Review - Web Form View
2. You can also open up to the actual https://app.grammarly.com website and create a blank document so you can either type your documents there and copy and paste into your actual web form or document. OR you can copy and paste your document into the Grammarly website and it’ll auto identify any mistakes. This is what I do.

Here is the App view, it opens Grammarly in a new tab via your web browser and identifies all the mistakes on the side.

Grammarly Review - App View

Did I mention Grammarly is free? Well, it has both a free version and paid version.

Free Version

I used the free version for the first 2 months, switched to the paid version for 2 months and now back to the free again. It’s fantastic. The free version is exactly the same as the paid version but I believe it only catches the obvious mistakes. By obvious mistakes, I mean 90% of the errors you make. This is still pretty significant. In my experience for this Grammarly review, the free version is the best for the value.

How they hooked me into the paid version (for a few months)

Like I said, the free version will catch 90% of your mistakes. The other 10% are usually just commas in certain locations that perhaps an English professor would pick up on.

As Grammarly is reviewing your document/web form/text. It’ll identify all your mistakes and give you suggestions on how to correct this. HOWEVER, it’ll also identify 3-9 errors that it won’t highlight and tells you that you need to buy the paid version to see these. At first, I freaked out. WTF am I missing here. They hooked me, I paid for the free version.

Once I had the free version, those 3-9 errors it suggested were just commas. SERIOUSLY! I didn’t gain much value out of paying the extra $30 monthly for it to tell me I had additional comma options and perhaps a few synonyms it suggested. This is why after the 2 months of trying it, I went back to the free version. Usually, people are forgiving if you miss a comma in the wrong location, spelling and sentence structure is just stupid. Grammarly will correct these in the free version.

How do I use Grammarly?

If I didn’t establish this already, I use this program and no they are not paying me to write this Grammarly review. Do people actually get paid to write reviews? If so, it doesn’t happen to me.

My process usually involves writing my blog posts in Microsoft OneNote first (awesome program). After the post is finished, I usually create pretty pictures or an infographic in collaboration. Why, because they’re cool. =)

Then I paste the text into Wallet Squirrel, which is WordPress platform. As soon as I paste the text into WordPress, Grammarly automatically starts reviewing my text and doing the solid red underline thing for any grammar issues. For spelling mistakes, it gives me multiple correction options and same for grammar mistakes and the use of wrong words like effect vs affect. Grammarly is especially good at helping with the right word choices. Using this process gives me double the grammar checking of both Microsoft and Grammarly. In my opinion, they are very similar.

After though, I love Grammarly for when I post on social media and comment on other bloggers, the Grammarly Chrome Extension constantly works to correct any issues on all of these platforms. So I don’t have to copy and paste my comments, I can type directly into these web forms and Grammarly picks up on the text and provides corrections if needed. It’s really a bloggers best friend.

Grammarly Competitors

This is by no means the only grammar checking software out there. It’s just the one I use and keep in mind you can use multiple apps here to create exceptional text if you’re paranoid, but I personally only use Grammarly though I may include Hemingway in the future. Here are the few others out there:

  • Hemingway – Best for overall readability of your text. It’s great for helping you write better.
  • Jetpack – WordPress Only Plugin
  • Ginger – Most similar to Grammarly
  • TurnItIn – Mainly a plagiarism double check

Do you use a grammar check program? Do you like it? What did you think of this Grammarly review?

Wallet Squirrel

Wallet Squirrel is a personal finance blog by best friends Andrew & Adam on how money works, building side-hustles, and the benefits of cleverly investing the profits. Featured on MSN Money, AOL Finance, and more!

www.walletsquirrel.com/

Mint App Review: See All Your Finances At Once

May 1, 2016/6 Comments/in Mint App, Review /by Wallet Squirrel

I’ve created a Mint App Review since I’ve used the Mint App for the last year and loved my experience. Using pretty infographics and my personal experience, let me share with you what Mint is, and how I use it to keep track of all expenses, income and finances. It’s pretty freaking awesome!

What is the Mint App

Mint.com was originally created in 2006 by Aaron Patzer to manage the growing number of financial intuitions people belonged to . No longer did people have ONE credit card with ONE car loan, all through ONE bank. When you wanted to check your checking account balance at your multiple banks, you had to log into each bank’s website separately, write down your balance and add everything up by yourself. Mint is an app that pulls all your balances, loan info, credit card debt from your different banks into one location (known as account aggregation if you’re a nerd). For example, my Mint App pulls my checking account balances from my three banks (Ally, Wells Fargo & a local bank here in Denver) into one screen so I can see how much I actually have. As well as pulls data from all my student loans to remind me how much I owe on each loan. It’s awesome to know that, but I cry a little each time….

In 2009, Mint was bought out by competitor Intuit (the people who make TurboTax) so you know it’s a heavily secure program.

Mint App Review: My Personal Experience For The Last Year

In January 2015, I paid off all my credit card debt and decided to take a hard look at my finances since I NEVER LOOKED AT MY FINANCES BEFORE. I was an idiot, don’t be an idiot. Mint (or any Money Manager App) is a great first step to financial independence.

My First Steps

I downloaded the Mint App on my phone in May 2015, while I simultaneously created a profile on their website, Mint.com. Doing it online seemed easier for me since it was a larger screen, but in hindsight, either way works.

Mint will first ask you to link your accounts to the app. You will have to look up your bank and enter the same passwords you would use to log into your bank from their website. It’s easy, but a little nerve wrecking since you’re submitting your bank passwords to an app. Please know, I haven’t had any issues with Mint, but always be cautious when submitting your bank info to anything. Once entered, it only pulls your balance info. Strangers can’t use the app to pull your passwords out of Mint.

I entered all my various accounts

  • My 3 Bank Accounts (My Primary Bank, My Old Bank & A local bank I use for my car loan here in Denver)
  • My Credit Card (my Double Cash Back Card)
  • PayPal Account (My affiliate websites pays via PayPal)
  • Company 401(K) Account
  • Lending Club
  • Car Loan
  • 2 Student Loans (State & Federal)
  • Robinhood App (Stock Brokerage Account)

I used to NEVER look at my bank account and just tried to spend less than what I thought I made. Yes, you read that right, I had no idea what I actually made. I never looked at my balances. I figured as long as I liked my job and spent less than I made, what does pay matter? I later discovered you can like your job AND ask for money to live. Apparently that’s a normal thing.

Spending

My absolute favorite thing about the Mint App is that it pulls your spending history from your credit card company and bank statements. So when you spend $5 on a cider from Stem Ciders (awesome cider place in Denver) Mint recognizes that as a bar and AUTOMATICALLY categorizes that $5 you spent in category “Food & Alcohol”. You can always switch categories if it messes up, but I’ve rarely had mistakes. Since you know I use my Double Cash Back Credit Card for everything, the Mint App has been perfect for tracking every expense I make and showing me in real time, how much I am spending in each category.

When I first started, I discovered I spent an exuberant amount on Fast Food (It really adds up). Once I had that data, I made a consequence decision to quit eating fast food and I SAVED SO MUCH MONEY!

Net Worth

One of the cool things that I want to include in this Mint App Review, is that calculates how much you have verse how much you owe to get your Net Worth. This is a cool feature, because when I entered all my accounts I discovered with all my student loans I’m worth less than I was when I was born. At age 29, I’m worth negative -$70,000. While that sucks, I at least now know and that’s way better than my negative -$80,000 last year. Yay for small victories. *fist pump*

Here is my Mint App Review Infographic to give you an idea of what it looks

Mint App Review Infographic


Now here is my lovely list of Pros and Cons

Pros:

  1. This is a FREE App. That’s incredible since it has literally changed my life. If this turned out to cost $100 a year tomorrow, I’d pay for it. It has been instrumental in my new financial journey to see where all my money is. Like I said, I literally had no idea where my money was a year ago. This app is amazing, I just had to write a Mint App Review.
  2. It has a clean and easy app interface. Anything that makes your life easier through intuitive design is worth it.
  3. You can set up a password to see your financial data if you would like. I have a password on my overall phone so the extra security doesn’t do much, but it’s nice.
  4. It has multiple features such as Overall Account Balances, Budgets (They’re simple but nice), Monthly Cash Flow (Income vs How Much you spent, I use this daily) & Spending (tracks what you spend your money on).

Cons:

  1. One of the biggest draw backs is that sometimes it can’t reconnect with a bank account or student loan account for me. So it just shows the lasted pulled data. However usually if you just wait 4 hours doing nothing, it’ll automatically reconnects on its own. For a free app I can’t complain, but you’ll see this as one of the biggest drawbacks if you read other Mint App Reviews.
  2. I always say, if you want to know a company, know how a company makes money. Since the Mint App is free, it makes money by giving “advice” such as “Based your spending habits, 20% of our customers have saved money by switching car insurance” or suggesting opening an IRA with Fidelity. These are sponsored suggestions, but Mint tries to tailor them to you. What makes it tolerable, is that Mint doesn’t do this in an obtrusive way. Plus I DID think it was helpful knowing other people with the same spending habits saved money by switching car insurance companies. HA jokes on you Mint, I relooked at my car insurance and went with someone else.

My Last Word

If you take anything from this Mint App Review, it’s that I’ve had a great experience. I think if you have any kind of multiple accounts, you should have some kind of Money Manager App (I don’t care what you choose, but I like Mint). There a couple great other apps out there, but the important thing is for you to be able to see all your financial statements in one location. I check mine multiple times throughout the day. You open the app, it loads the latest information and “WAA LAY” a complete overview of your finances.

Plus for me, once I see any kind of credit card debt from my Mint Profile, I instinctively open my Citi Card app and pay off my credit card right away. It’s a cool feeling to start every day knowing your credit card debt free! Maybe I’m weird, but I can live with that.

What do you think of this Mint App Review? Do you use Mint? If not, what Money Manager App do you use?

Wallet Squirrel

Wallet Squirrel is a personal finance blog by best friends Andrew & Adam on how money works, building side-hustles, and the benefits of cleverly investing the profits. Featured on MSN Money, AOL Finance, and more!

www.walletsquirrel.com/
Page 3 of 41234

Our Favorite Article!

Get Wallet Squirrel Emails!

Read This Next:

  • 2022 December - Wallet Squirrel Income Report Income Report – December, 2022January 3, 2023 - 6:12 pm
  • The Best Payment Methods To Survive and Grow Your E-Commerce BusinessSeptember 6, 2022 - 1:09 pm
  • may-2022-income-reportIncome Report – May, 2022June 7, 2022 - 8:30 am

Directory

  • 70 Creative Ways to Make Money + How Much
  • About
  • Blog
  • Contact
  • Income Reports
  • Portfolio
2021 © Copyright - Wallet Squirrel - powered by Enfold WordPress Theme
  • Pinterest
  • Facebook
  • Twitter
  • Awesome Blog
  • Disclaimer
  • Contact
Scroll to top